
How to Knit for Beginners
What is Knitting?
Knitting is a method of creating fabric by interlocking loops of yarn or thread using knitting needles or a knitting machine. It is a popular craft that has been practiced for centuries.One of the great things about knitting is that it’s accessible to anyone, regardless of age or skill level! With a few basic materials and our how to below, anyone can learn to knit. Once you get the hang of it, the possibilities are endless!
What do I need to begin knitting?
One of the best things about knitting is that you don't need a lot to get started – you can get by with just two things:
However, having access to additional tools can make things easier. Let's get a little more detailed and then you'll be able to decide what's right for you.
Choose your yarn
Choosing the right yarn for your project will ensure that your finished product looks and feels the way you want it to. Yarn comes in different weights, colors, and fibers. You can find more information on the different yarn weights in our yarn weight comparison post coming soon! Beginners may find it easier to start with medium weight yarn in a light color. This will make it easier to see your stitches and correct any mishaps along the way.
We recommend starting with Basic Stitch Anti Pilling™ Yarn or similar.
Choose your needles
Knitting needles come in a variety of sizes and materials, such as metal, bamboo, or plastic. The size of the needles you choose will depend on the weight of the yarn you are working with, as indicated on the yarn label.
Needle Composition: Knitting needles can be made from a variety of materials, each with its unique characteristics. The most common materials are:
- Metal – Durable and smooth, making them great for fast knitting. They can be slippery, which some knitters prefer.
- Bamboo – Lightweight, flexible, and have a warm feel. They provide good grip, which can be helpful when working with slippery yarns.
- Wood – Similar to bamboo, but with slightly different characteristics based on the type of wood used.
- Plastic – Inexpensive and lightweight. They have a smooth surface but may not be as durable as metal or wood.
Types of Needles: There are primarily two types of knitting needles:
- Straight Needles – These are the traditional, long, straight needles with a point at one end and a knob or cap at the other end to prevent stitches from falling off. Straight needles are typically used for flat knitting, such as scarves and blankets.
- Circular Needles – These consist of two tapered needle tips connected by a flexible cable. Circular needles can be used for both flat and circular knitting. They are particularly useful for larger projects like sweaters, as they can hold a large number of stitches and distribute the weight of the project more evenly.
Knitting Needle Sizes: Knitting needles come in various sizes, denoted by numbers or letter codes. The size indicates the diameter of the needle shaft. Smaller needles are used for finer yarn and projects that require a tighter gauge, while larger needles are used with thicker yarn for looser, more open stitches.
Gauge: The gauge refers to the number of stitches and rows per inch (or centimeter) achieved with a specific needle size and yarn. It's crucial to match the gauge mentioned in a knitting pattern to ensure the finished project's dimensions are correct.
Specialty Needles: In addition to the standard straight and circular needles, there are various specialty needles available, such as:
- Double-Pointed Needles (DPNs) – Short needles with points at both ends, used for knitting small, tubular items like socks or mittens in the round.
- Interchangeable Needles – These are sets of needle tips and cables that can be interchanged, allowing you to create custom circular needles of different lengths.
- Lace Needles – Needles with sharp, pointed tips designed for intricate lacework.
- Cable Needles – Short needles used to hold stitches temporarily while creating cable patterns.
Needle Care: Proper needle care can extend their lifespan. Clean them as needed and store them in a safe place to prevent damage or bending.
Choosing the right knitting needles is essential for achieving the desired result in your knitting projects. The best needles for you will depend on your knitting style, the yarn you're using, and the type of project you're working on. Experiment with different types to find your favorite!
Additional tools
These may not be required for every project, but it's usually a good idea to have these handy to make the job easier:
- Scissors – a pair of sharp scissors will come in handy for cutting yarn and trimming loose ends
- Yarn needles – these are used for weaving in loose ends and sewing pieces together
- Stitch markers – these are helpful for marking specific stitches or sections in your work
- Measuring tape – a flexible measuring tape is useful for checking gauge and measuring your work
- Other accessories – some crafters enjoy using a yarn bowl or bag to keep their yarn organized, and a row counter to help keep track of their stitches
Now that you have your materials - let’s knit! Here you’ll find a handy step by step guide that you can refer back to at any time! Remember - it will take some time to learn. Mistakes are okay – they are a part of the process.
A Step-by-Step Guide to Knitting
1How to Cast On
Casting on is the first step in starting a knitting project. There are various ways to cast on, each offering different advantages and appearances. The most common cast on method is the Long Tail Cast On. This method is the best for beginners.
Long Tail Cast On
- This is one of the most popular and versatile cast-on methods.
- It creates a neat, elastic edge that is suitable for a wide range of projects.
- It requires a long tail of yarn to be left before starting the cast on.
- Great for beginners and experienced knitters alike.
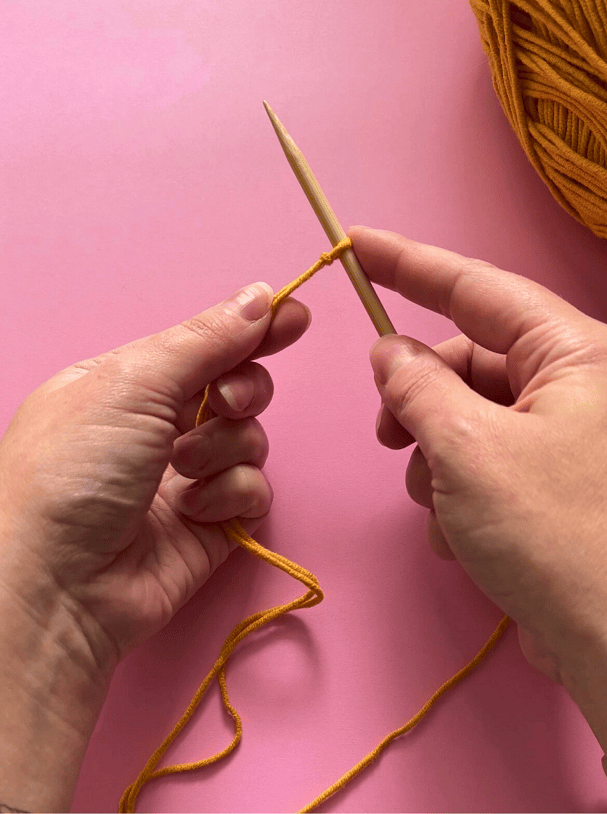
1) Make a split knot, put it on the needle, and hold both strands of yarn in your left hand |

2) Insert your thumb and index finger in between the 2 strands of yarn |

3) Pull the yarn taught to create 2 loops |

4) Put your needle under the strand closest to you - your outer thumb - then bring it up through the thumb loop |

5) Bring your needle over to the index finger loop and grab the strand closer to you |

6) Swing back around and pull the yarn down through the thumb loop |

7) Slowly release the loop off of your thumb |

8) Pull tight - but not too tight! |

9) Repeat until you have cast on the desired number of stitches |
There are other methods to casting on that we will get into in later tutorials.
Knitted Cast On
- Simple and easy to learn, this cast on is similar to working a knit stitch.
- It creates a firm, less stretchy edge compared to the long tail cast on.
- It's a good choice when you need a neat edge but with less elasticity.
Cable Cast On
- This method produces a neat and firm edge, making it ideal for starting projects like scarves.
- It involves the use of a knitting needle to place new stitches onto the left-hand needle.
Backward Loop Cast On
- The backward loop cast on is the easiest to learn and requires no tail of yarn.
- However, it can create a rather loose edge and may not be suitable for all projects.
Loop Cast On
- Similar to the backward loop cast on, but with an added twist that helps prevent excessive looseness.
- Still easy to learn and works well for projects where a little extra stretch is needed.
Tubular Cast On
- Creates a neat, stretchy edge that resembles a seamless continuation of ribbing.
- It's a bit more advanced and typically used for projects like cuffs or hems.
Once you have cast on your stitches, you’re ready to begin knitting!
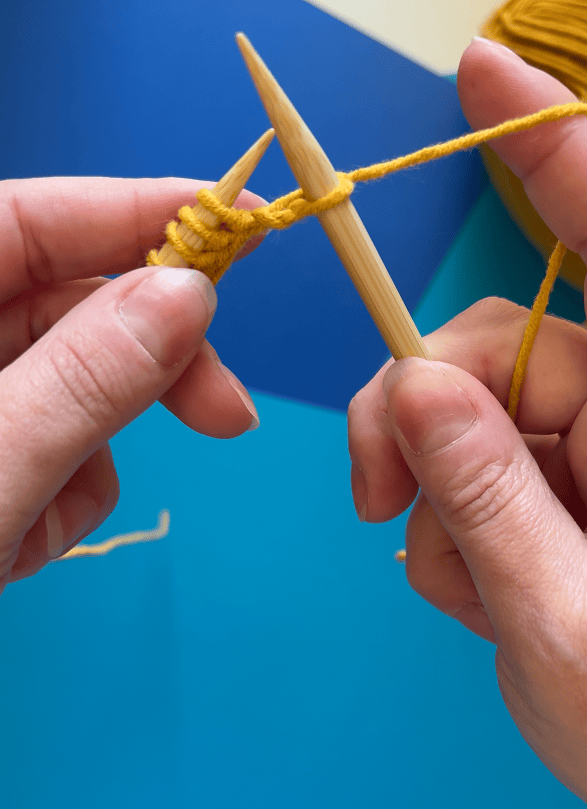
2How to Make a Knit Stitch
The knit stitch is the most basic stitch in knitting. Here’s how to make the knit stitch.
- Hold the needle with the cast-on stitches in your left hand and the empty needle in your right hand. Insert the right needle through the first stitch on the left needle, from left to right.
- Wrap the yarn counterclockwise around the right needle.
- Pull loop of yarn through the stitch.
- The right needle will now be in front of the left needle with a loop of yarn on the needle.
- Slide stitch off the left needle.
- You have now completed your first knit stitch! Repeat until all stitches are off the left needle.

1) Hold the needle with the cast-on stitches in your left hand and the empty needle in your right hand. Insert the right needle through the first stitch on the left needle, from left to right. |

2) Wrap the yarn counterclockwise around the right needle. |

3) Pull loop of yarn through the stitch. |

4) The right needle will now be in front of the left needle with a loop of yarn on the needle. |

5) Slide stitch off the left needle. |
6) You have now completed your first knit stitch! Repeat until all stitches are off the left needle. |
3Turning Your Work
Once you’ve finished your row, it’s time to turn your work. To turn your work, simply swap the needles so that the needle with stitches is in your left hand with the empty needle in your right hand.
4How to Bind Off (also known as Cast Off)
Once you have reached the desired length of your swatch or project, it's time to bind off.
- To bind off, knit the first two stitches as usual.
- Then insert the left needle into the first stitch on the right needle.
- Bring the first stitch over the second stitch.
- Drop the first stitch off the left needle.
- Knit one more stitch, then lift the first stitch on the right needle over the second stitch again. Repeat this process until you have one stitch remaining on your right needle.

1) Knit the first two stitches. |

2) Insert the left needle into the first stitch on the right needle. |

3) Bring the first stitch over the second stitch. |

4) Drop the first stitch off the left needle. One stitch has been cast off. |
5Finishing
To finish the last stitch, once you have completed binding off all working stitches on your needle, cut the yarn leaving a 6 in. tail to weave in later. Thread the yarn through the stitch and pull through until the end pops through. Pull tight! You have now finished your piece - all you need to do now is weave in your ends!

1) Once you have completed binding off all stitches, you will have one loop left on your right needle. Cut the yarn leaving about a 6 inch tail. |

2) Remove the needle from the loop. |

3) Draw the yarn through the loop. |

4) Pull until the end pops through. |
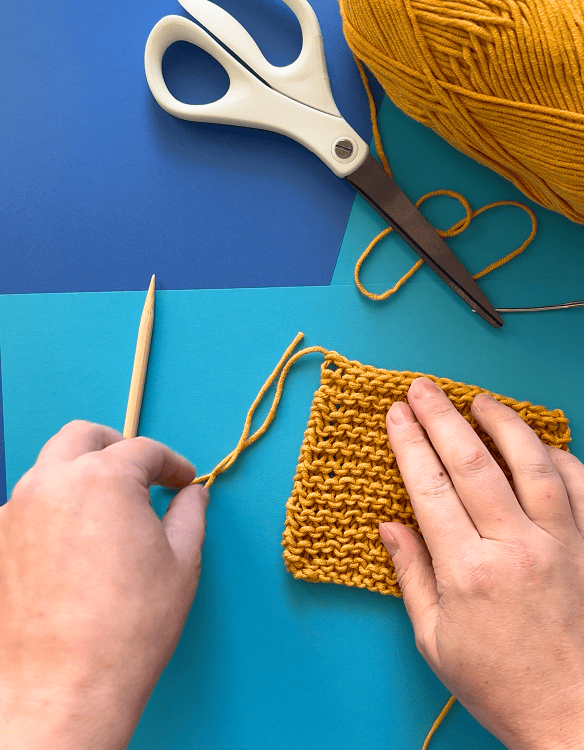
5) Pull tight. Yay! You've finished binding off! Now all that is left to do is weave in the ends. |
More Knitting Techniques
Check out our Stitch Finder for hundreds of crochet and knit stitch patterns, trims, motifs, and decorative elements! Each one includes detailed instructions on how to create them.
Knitting Pattern Terms and Abbreviations
Did you encounter an unfamiliar term when reading a pattern? We've got you covered! Check out our glossary for a comprehensive breakdown of every term you might find when reading a knitting pattern.