

Cable Knitting Beginners Guide: Master Your First Cables
Image: Simple Cable Knit Scarf
Cable knitting is defined as a technique that creates raised, twisted stitch patterns by crossing groups of knit stitches over each other using a cable needle. This cable knitting beginners guide covers everything you need to start: the right tools, step-by-step technique, beginner-friendly projects, and fixes for the most common mistakes. You only need basic knit and purl skills to begin. With smooth yarn, the right needle, and a clear process, your first cable is closer than you think.
What do you need to start cable knitting?
The single most important material decision you make as a new cable knitter is your yarn. Smooth, medium-weight yarn in DK or worsted weight is the standard recommendation for beginners because the stitches stay visible and easy to count. Fuzzy fibers like mohair or cashmere hide the cable twist entirely, which makes it nearly impossible to see where you are in the pattern. Lion Brand Wool-Ease Yarn is a strong starting choice: it is smooth, slightly elastic, and available in worsted weight, which gives cables excellent definition.
Beyond yarn, you need a cable needle. Cable needles with a bent center or grooves are the best option for beginners because they hold stitches securely without sliding off while you work the crossing. A double-pointed needle or a stitch holder can substitute in a pinch, but a dedicated cable needle gives you more control when you are still learning the motion. Match your cable needle size to your main needles so stitches transfer smoothly without stretching.
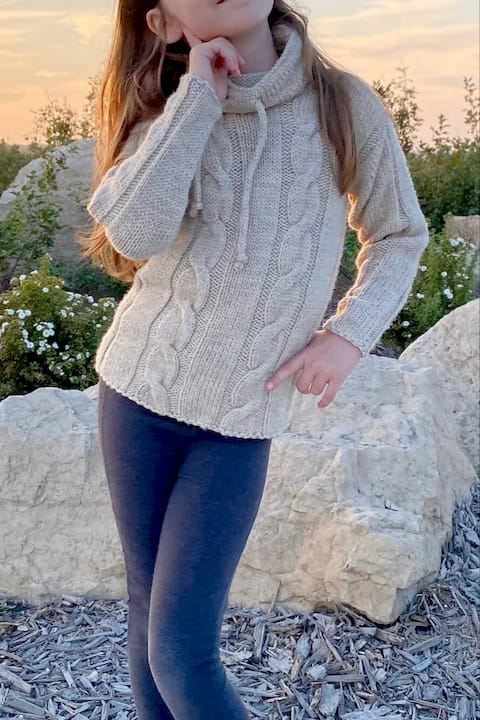 Image: The Kids Cable Pullover
The table below compares your main material options at a glance:
| Material | Best Option | Acceptable Substitute |
|---|---|---|
| Yarn weight | Worsted or DK | Aran weight |
| Yarn fiber | Smooth wool or acrylic | Cotton blend |
| Cable needle | Bent center or grooved | Double-pointed needle |
| Main needles | US 7–9 for worsted | Circular needles work too |
Pro Tip: Try two or three cable needle styles before committing. Some knitters prefer a straight cable needle; others find the J-shaped version keeps stitches from slipping. The right one is whichever feels natural in your hand after a few rows.
How do you knit your first cable stitch?
Cable knitting creates its twist by slipping stitches onto a cable needle, holding them temporarily, knitting the next stitches from the main needle, and then knitting the held stitches. That sequence is the entire technique. The direction of the hold determines which way the cable leans, and that is the only real variable you need to manage.
Here is the step-by-step process for a basic 4-stitch cable, the most common beginner cable:
Work to the cable position in your row.
Slip 2 stitches purlwise onto your cable needle.
Hold the cable needle to the front of your work for a C4F (cable 4 front) or to the back for a C4B (cable 4 back).
Knit the next 2 stitches from your main needle.
Knit the 2 stitches from the cable needle.
Continue across the row as the pattern instructs.
The table below shows how C4F and C4B differ in execution and result:
| Step | C4F (cable front) | C4B (cable back) |
|---|---|---|
| Hold position | Cable needle to front | Cable needle to back |
| Knit next | 2 sts from main needle | 2 sts from main needle |
| Knit held | 2 sts from cable needle | 2 sts from cable needle |
| Cable direction | Twists left | Twists right |

C4F holds stitches to the front and twists left; C4B holds to the back and twists right. Memorizing this pairing is the single fastest way to stop second-guessing your cable direction mid-row. Think of it as a simple rule: front equals left lean, back equals right lean.
Cables naturally pull fabric inward and tighten stitches around the crossing point. This means your cable rows will feel slightly stiffer than your plain knit rows, which is normal. If the fabric feels very tight or the stitches are hard to slide, go up half a needle size.
Pro Tip: Practice your first cable on a small swatch of 20 stitches before starting any project. Swatching lets you feel the motion, check your tension, and confirm your cable leans the right direction without any pressure.
What are the best beginner cable knitting projects?
The best first cable projects use small cable repeats like 2/2 or 3/3 cables on flat, rectangular pieces where you can focus entirely on the crossing technique. Scarves and cowls are the classic starting point because they have no shaping, no seaming, and a forgiving stitch count. A cable scarf lets you repeat the same 6 or 8 row sequence until the technique becomes automatic.
Good beginner cable project types include:
Cable scarves: Flat knitting, simple repeat, no shaping required. The Lion Brand favorite classic cable scarf is a direct starting point.
Hats: Small stitch count, quick finish, and a satisfying result that shows off the cable clearly.
Simple afghans: The Lion Brand classic cable throw is designed specifically for new cable knitters and uses a manageable repeat.
Accessories: Headbands and wrist warmers give you cable practice in under an hour of knitting.
Vests: Once you have a few scarves under your belt, the Lion Brand deep v cable vest is a natural next step with simple shaping.
Always knit a swatch before starting any project that needs to fit, like a hat or vest. Cable fabric gauge differs from standard stockinette because the crossing compresses stitches and then re-expands them. A swatch confirms your actual stitch count per inch so the finished piece matches the pattern dimensions. Skipping this step is the most common reason a cable hat comes out too small.
Increase complexity gradually. Start with a single cable panel on a scarf, then move to two panels, then to allover cable patterns. Each step adds one new variable rather than several at once.
What are the most common cable knitting mistakes and how do you fix them?
The most frequent beginner error is holding the cable needle in the wrong position, which produces a cable that leans the opposite direction from the pattern. The most common direction error is confusing front and back hold, and the fix is straightforward: memorize C4F as left lean and C4B as right lean, then double-check your pattern abbreviation before every cable row.
Here are the most common mistakes and their fixes:
Wrong cable direction: Check whether the pattern says C4F or C4B before you slip any stitches. If you notice the error within a few rows, rework the twist early by laddering down to the mistake and re-crossing correctly.
Dropped stitches during crossing: Slow down the transfer to the cable needle and make sure all stitches are fully seated before you let go of the main needle. A grooved cable needle prevents slipping.
Tight, puckered cables: Relaxed tension and needle size adjustments are the direct fix. If your cable rows feel stiff, go up one needle size for the entire project or consciously loosen your grip on cable rows.
Losing your place in the pattern: Use a row counter or place a removable stitch marker at the start of each cable row. Count horizontal bars over cable stitches to track how many rows have passed since the last crossing. This method works even when you put the project down for days.
Misreading abbreviations: Write out C4F and C4B with their directions on a sticky note and keep it next to your work. Pattern shorthand is the most common source of confusion for new cable knitters.
Pro Tip: After every cable crossing, count the bars between your last two twists before moving on. Modern Daily Knitting recommends this visual check as the most reliable way to stay on track, especially in patterns with different cable intervals across the same row.
Key takeaways
Cable knitting requires smooth yarn, a correctly held cable needle, and consistent tension to produce clean, defined twists from your very first project.
| Point | Details |
|---|---|
| Yarn choice matters most | Use smooth DK or worsted weight yarn so cable twists stay visible and easy to count. |
| Front vs. back hold | C4F twists left; C4B twists right. Memorize this before starting any cable row. |
| Start with small cables | 2/2 or 3/3 cable repeats on scarves and hats build technique without overwhelming complexity. |
| Swatch before projects | Cable gauge differs from stockinette, so always swatch to confirm stitch count per inch. |
| Track rows visually | Count horizontal bars over cable stitches to reliably know when to cross again. |
Start your first cable project with Lion Brand
Lion Brand makes it easy to go from reading about cables to actually knitting them. The free pattern library includes beginner-labeled cable designs for scarves, hats, and afghans, all with clear instructions and manageable stitch counts.
For your first project, the simple cable scarf gives you enough rows to practice the crossing rhythm until it feels natural. Pair it with Wool-Ease Yarn in worsted weight for crisp stitch definition and a soft, durable result. If you need needles, the Boye aluminum straight needles are smooth enough to make stitch transfers easy, which matters a lot when you are learning the cable motion. Browse the full collection of knit and crochet kits to find everything bundled together for a clean start.
FAQ
What is cable knitting?
Cable knitting is a technique that creates raised, twisted patterns by crossing groups of stitches using a cable needle. The direction of the hold, front or back, determines which way the cable twists.
Do I need a cable needle to knit cables?
A cable needle is the most reliable tool for beginners because it holds stitches securely during the crossing. A double-pointed needle or stitch holder can substitute, but a dedicated cable needle reduces the risk of dropped stitches.
What yarn is best for beginner cable patterns?
Smooth DK or worsted weight yarn gives cables the clearest definition and makes stitches easy to count. Avoid fuzzy fibers like mohair for your first cables, as they obscure the twist entirely.
How do I know when to cross my cable stitches?
Your pattern will specify the row interval for each crossing. Count the horizontal bars over your cable stitches after each twist to track your progress reliably, as Modern Daily Knitting recommends this as the most accurate method.
Why do my cables look tight and puckered?
Cables naturally compress fabric at the crossing point. If your cable rows feel stiff, loosen your grip, or go up one needle size for the project to maintain correct gauge and an even fabric.
