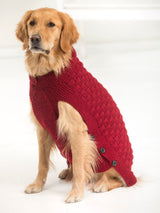
Clifford Dog Sweater (Knit)

SKU: L50183

The Clifford Dog Sweater is a knit sweater pattern made with medium weight yarn that has a skill level of easy.


Skill Level
Level 2 - Easy (Beginner+)
Project Type
Sweater
Yarn Used
Vanna's Choice® - 860
Pattern Gauge
18 sts + 24 rows = about 4 in. (10 cm) in Basketweave pattern. 16 sts + 24 rows = about 4 in. (10 cm) in St st (k on RS, p on WS).;
Pattern Size Options
L, M, S, XL
Pattern Sizing Information
Pattern is written for smallest size with changes for larger sizes in parentheses. When only one number is given, it applies to all sizes. To follow pattern more easily, circle all numbers pertaining to your size before beginning.
Pattern Yarn Weight
4 Medium / Worsted
Dimensions Detail
Finished Neck Circumference About 12 (14, 16, 18) in. (30.5 (35.5, 40.5, 45.5) cm) Finished Chest About 14 ? (18, 21 ? , 25) in. (37 (45.5, 54.5, 63.5) cm) Finished Length 12 (16, 19, 24) in. (30.5 (40.5, 48.5, 61) cm), including neckband
Pattern Craft
Knit
Made For
Pet

Customer Reviews

Based on 3 reviews
0%
(0)
33%
(1)
33%
(1)
33%
(1)
0%
(0)
L
Linda
Buttonhole rows

Buttonhole row 1 says: Work in Seed st as established over first 2 sts, bind off next 2 sts for buttonhole, work in Seed st to marker, slip marker (sm), work next row of Basketweave pattern to next marker, sm, work in Seed st as established to last 4 sts, bind off next 2 sts for buttonhole, work in Seed st to end of row.

So I bound off the 2nd 2 stitches of seed stitch. Then it sounds like I am supposed to do seed stitch across the row, to next marker.

OR, does it mean to do the 4 seed stitch stitches, and then bind off 2 stitches, in the basketweave pattern area?

Hello Linda - if you're making one of the smaller sizes, with only 4 sts of seed stitch in the border on either side, then the buttonhole bind off will take you to the first stitch marker, so you'll switch to the basketweave pattern and work across to the next marker, where you'll bind off 2 and then knit the remaining 2 sts in pattern.
If you're knitting a larger size with 8 sts in the border then you'd have more stitches to knit in seed stitch before you get to the marker indicating the switch to the basketweave pattern.
If you still have questions on this, please email us at [email protected] and we'll be happy to help!

p
peg hanscom
new format

Being someone who hates finish work, I would love the make this sweater but in the round instead of flat and having to piece everything together. Any chance this is doable? No chance of my figuring it out myself.

Hi Peg - you could make the middle section of the pattern in the round (where you're seaming back and under pieces together) as well as the neck above the armholes. If you want to modify this pattern in this way we suggest starting at the neck and working the sweater down from there.

A
Anita Thomas
Confusing

I found the instructions for the back to be confusing at the point where one decreases to shape the sides. For the small size, it seems we decrease a total of four stitches and that's it. But the illustration of the back appears that it could be decreased more than that, however, it's not clear because there are no solid lines depicting the outside shape of the knitted up piece in the area near the end with the decreases. What is illustrated with the dotted line looks to be more of a gradual and continual decrease pattern, yet that is not what I read in the instructions. What are they really saying with that dotted "sew" line"? That angle is not represented in the instructions as far as I can see. I would love some feedback as to what I've misunderstood here.

You may also like

Recently viewed

Customer Reviews

Based on 3 reviews
0%
(0)
33%
(1)
33%
(1)
33%
(1)
0%
(0)
L
Linda
Buttonhole rows

Buttonhole row 1 says: Work in Seed st as established over first 2 sts, bind off next 2 sts for buttonhole, work in Seed st to marker, slip marker (sm), work next row of Basketweave pattern to next marker, sm, work in Seed st as established to last 4 sts, bind off next 2 sts for buttonhole, work in Seed st to end of row.

So I bound off the 2nd 2 stitches of seed stitch. Then it sounds like I am supposed to do seed stitch across the row, to next marker.

OR, does it mean to do the 4 seed stitch stitches, and then bind off 2 stitches, in the basketweave pattern area?

Hello Linda - if you're making one of the smaller sizes, with only 4 sts of seed stitch in the border on either side, then the buttonhole bind off will take you to the first stitch marker, so you'll switch to the basketweave pattern and work across to the next marker, where you'll bind off 2 and then knit the remaining 2 sts in pattern.
If you're knitting a larger size with 8 sts in the border then you'd have more stitches to knit in seed stitch before you get to the marker indicating the switch to the basketweave pattern.
If you still have questions on this, please email us at [email protected] and we'll be happy to help!

p
peg hanscom
new format

Being someone who hates finish work, I would love the make this sweater but in the round instead of flat and having to piece everything together. Any chance this is doable? No chance of my figuring it out myself.

Hi Peg - you could make the middle section of the pattern in the round (where you're seaming back and under pieces together) as well as the neck above the armholes. If you want to modify this pattern in this way we suggest starting at the neck and working the sweater down from there.

A
Anita Thomas
Confusing

I found the instructions for the back to be confusing at the point where one decreases to shape the sides. For the small size, it seems we decrease a total of four stitches and that's it. But the illustration of the back appears that it could be decreased more than that, however, it's not clear because there are no solid lines depicting the outside shape of the knitted up piece in the area near the end with the decreases. What is illustrated with the dotted line looks to be more of a gradual and continual decrease pattern, yet that is not what I read in the instructions. What are they really saying with that dotted "sew" line"? That angle is not represented in the instructions as far as I can see. I would love some feedback as to what I've misunderstood here.