I have really enjoyed all the comments and questions many of you have posted during this CAL of the “Moderne Jacket” and although it is wonderful to hear that some of you have finished, I know that many of you (like me) have been “in pieces”! This week I finished the sleeves and made sure to keep the first sleeve I made close by for the second, to make sure the shaping and length turned out the same.
Luckily, they did turn out the same – although I had to keep track of my stitch count every row. I found myself writing down the number of stitches I should have at the end of a row, just in case I was called away from my jacket.
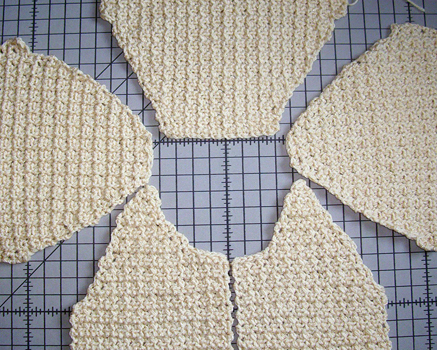
So, after I finished my back, fronts and two sleeves – I laid them out to see if they all would fit together and in the correct order:

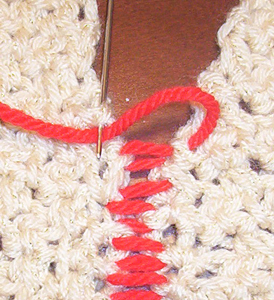
Since this jacket is a raglan, I needed to sew the sleeves to the front and backs before I can work the collar. I wanted to make the seams as flat as possible, so with the right side facing me, I sewed the seams going through the edge of the stitches on each side. I thought I demonstrate with some red yarn to show you the path of my stitching:

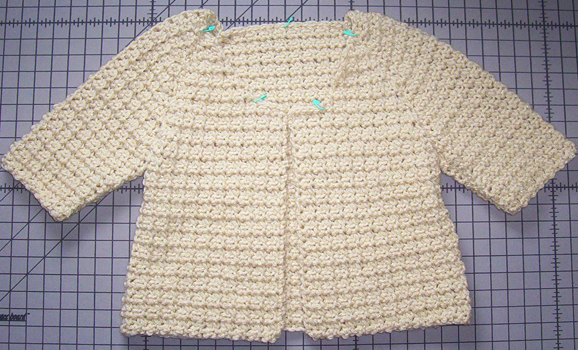
The resulting seam was nice and flat which is good for a jacket made with a thick fabric. I also used stitch markers to hold my pieces together, so that one side wouldn’t be longer than the other. Then I was “on a roll” and I sewed up the sleeve and side seams the same way. I wove in ends and wow, a jacket!

It’s hard to believe that all that is left is the collar and the buttons! For the small size, I have to work 57 sc evenly around the neck, starting and ending 1 1/2” from each edge. I’ve already evenly spaced markers to divide the collar into 4 even sections – so I will work 14, 14, 14 and 15 stitches in these sections to get to my 57 stitches. I’m really getting anxious to see this on my little (5’9”) girl!
What about you? Tell us how you’re project is coming along! Don’t forget to share your photos either on our Flickr group (see the link below) or in the Lion Brand Customer Gallery.
Related links:
You must be <a href="https://blog.lionbrand.com/wp-login.php?redirect_to=https%3A%2F%2Fblog.lionbrand.com%2Fmoderne-jacket-crochet-along-putting-together-the-pieces%2F">logged in</a> to post a comment.
Catherine
Oh my goodness you are almost done! I have just finished the back. I took the project with me on vacation. People kept commenting on the fact that I was always taking out instead of putting in.
I really had a tough time with decreasing and keeping the pattern lined up while people were talking to me. Once I got home I finished the back. I am not sure I have it sized correctly, but will continue on and fix later if I need to. Now onto the front. I think it will go much easier now that I know what I am doing.
Fay Baker
I am almost done with my left front but am not sure I am always counting stiches correctly. How do you count the slip stich on the dec rows? also- I know the sctog is 2 stiches, but what about when you dec and leave out the ch 1 – how many stiches is that? I THINK I’m doing it right but want to be sure. Thanks.
Heather says: “Hi, Fay: The slip stitches done on the fronts and back of this jacket are only where you start to shape for the underam. After you slip a stitch it is “finished off” so if you are slip stiching 2 sts, then you will have 2 less in that row. When you leave out a ch1, that will make your row have 1 less stitch. You may want to read through my responses on the earlier posts as many people had questions about the shaping. I hope this has helped you!”
anne
Do I need to block my piece? How should I block it? I’ve never made a garment before and not real sure what I have to do.
Zontee says: Hi Shannon, click here to check out the FAQ about blocking on LionBrand.com — and don’t forget to check the care instructions on your yarn before blocking!
Shannon Wells
Well, I guess I’ll go first. I finished sewing it together and the seams do look great, but it’s way too big. The front looks fine, it’s the back and sleeves. I think I just crocheted way too loosely, so I’ve started another one, 2 sizes smaller. I am using bulky yarn, so maybe that’s what happened, but other than that, it looks great! I’m real pleased, just wish it fit. I’ve had a lot of fun, though. Thanks to all for their comments and suggestions. Hope everyone else had better results.
Linda
I’m still on the back also. I don’t understand the decrease. Am I suppose to do the decrease row and then do seven rows in the pattern with no decrease and then decrease one row again? I knew I was going to fall behind but this went fast. I’m also making mine longer than the directions show so that took a bit longer – enough excuses.
Heather says: “Hi, Linda: You are correct about the decrease rows on the bottom of the back – there are seven rows worked even, then the decrease row again. Don’t worry about getting behind as all the posts will remain on the Crochet-Along link!”
Inge
Wow! Heather,
Your jacket looks great and your stitches/pattern of squares is interesting. I seem to have two different stitches/patterns on my sweater. I found that when one goes into the ch-1 sp first, then through the chain/sc2togs, the stitches seem to be squared when when doing the sc2tog, ch 1. This happened when doing the raglan shaping at the top of my back of the sweater. When doing the sc2tog the other way through the chain/sc2tog first, then ch1-sp, my stitches/pattern are at a diagonal slant. Is this true???? I left it on the back, but I have to re-think what to do on the front panels. I have had some trouble with keeping count and seem to loose a stitch before I get to the raglan shaping. I am using stitch markers to show when I first did my decrease and it helps me in counting rows. That way If I have to tear out the stitches I know where to stop.
Heather says: “Hi, Inge: Thanks for your kind words! You are right about the pattern “shifting” after the decreases and you may want to read my second and third posts about working the pattern with a color that does show those changes. It’s sounds like yours is shaping up nicely, just keep counting those stitches and use those markers!”
Janet
I have all of my pieces finished and am ready to block. My pieces measure what they should. Is it necessary to still block them? I have blocked other items in the past so I’m not worried about that, just the necessity. Also, should I use two yarns for seaming my pieces?
Heather says: “Hi, Janet: If your pieces are laying flat and measure correctly – then you really don’t need to block before sewing. Using one strand to sew up will make a more flexible seam, so you can try that first to see how it looks.”
Debbie
I have finished the sweater and love the way it looks. The only question I have is the buttons are to big for the button holes. If I understand the directons correctly you use the hole at the end of the row for the buttonhole. Am I misunderstanding? Maybe I will just wear it unbuttoned. I did this jacket in the wool and Vanna’s choice. I enjoyed the pattern so much I have already started a spring jacket with 2 strands of cotton.
Heather says: “Hi, Debbie: Glad your sweater turned out so nicely! As for the buttons, the holes created by the ch1 space are used for buttonholes. You may want to make a swatch of the fabric and try to stitch around one of those holes to make it larger and see if it works. (I always try this on a swatch so I don’t have to rip back out on my project.) If not you may want make smaller buttons with a smaller hook.”
Lisa Hemphill
Well, I am onto the sleeves now and I am finding that the increase rows before raglan shaping only look like they are increasing on one side. I guess with blocking I can tweak it some and since it is underarm seam it won’t matter much. Right?
Heather says: “Hi, Lisa: I would try blocking your sleeve. Sometimes these stitch patterns can slant to one side and blocking should take care of it.”
Diane
Well, after going back to do the fronts two different times, ripping out, and trying again, I finally got it done and sewn together. I am in the process of completeing the collar now, and can’t wait to see how it looks. I will let everyone know how it turned out soon.
Susan
Okay, finished this last week, but found that it didn’t fit the way I wanted it to, so I’m starting over and doing the next size up. Also, I found that the sleeves seemed too short, so am adding rows this time so that it is 3/4 sleeve (orignal was elbow length). LOVE this jacket and am enjoying crocheting it, is going faster now that it’s the second time around. Looks good on (a smaller friend tried on the first version)! I like the weight of the yarn, though may seem too thick for summer here in CA.
Shannon Wells
I have finished the back and most of a sleeve the second time around, and I too find it is going much quicker this time. I too was surprised about the elbow length sleeve, but I don’t have a problem with it; I don’t like something clinging to my arms. If this one turns out, I want to make it in cotton or something equally light weight. I am making the sleves after the back, so I can sew them on and have an idea of the fit before doing the fronts. As a person who is blind, I was a little worried about sewing it, but I worked in a factory a few years ago that made jackets. I went back and forth sewing the sleeves to the backs and the fronts to the sleeves, so remembering what I had done, made sewing this jacket easy.
Heather says: “Hi, Shannon – I think it is wonderful and inspiring that you have made this jacket and would like to see any pictures when you have finished it!”
Shannon Wells
Heather, I’d be glad to post a picture when I am finished. How do I go about it?
Heather says: “Hi, Shannon – You can join our Flickr pool at the link below. Then you can upload photos to the other Moderne Jacket CAL participants”
http://www.flickr.com/groups/lionbrandcal/
Diane
I have finished the jacket and I love it. I am also having a problem with the buttons. I think my crocheting is much tighter than what yours appears to be. I will try to make them with a smaller hook. This one will go to my daughter, and I am going to make one for myself but in a larger size. Thanks so much for such a fun project, and such a cute jacket. This was my first Crochet Along, and I have enjoyed being aprt of a project that so many are doing at the same time. Whenever I have told people about this they think it is so unique. Thanks!!!
Barbara
I hope this doesn’t break any rules.I am actually just starting the knit along sweater and have a problem.My husband was in the hospital having heart surgery so I had my knitting with me and the first page of the instructions were torn.I can’t find the little piece and I am missing some instructions.I really don’t want to have to buy the pattern for one page and I was hoping someone could email the beginning of the actual instructions.Thanks.Barbara
Zontee says: Hi Barbara, if you downloaded the pattern in your LBY account (whether free or paid) you can always re-download the pattern by signing onto LionBrand.com, going to the orange “My LBY” button, and clicking on the “My Downloads” tab. You’ll see ALL of the patterns you’ve downloaded and be able to re-download them. Just another neat feature of a Lion Brand account!
Ruth Selvius
We are back from vacation and I am trying to view the “Tackling the Back” update on March 19.
The message keeps popping up that this is no longer available. Would it be possible for me to obtain this information? I would like to crochet this jacket, even though the crochet-along is almost over.
Thank you for your assistance.
Ruth Selvius
Zontee says: Hi Ruth, where are you clicking on it? I just clicked on the title in the “Related links” in Heather’s post above and it took me right there. Here’s another link to it just in case. Hope that helps.
Rhonda
I finished over the weekend and posted it in the customer gallery. I do wish it were a bit more flattering but at least it mostly fits.
Rhonda
I added a closer picture Monday 3pm Central, so check back if it’s not there as the posting has been removed to be reapproved. Hopefully it will be back soon. Sorry…
Zontee says: Hi Rhonda, looks like it’s back up. Very nice!
Shannon Wells
Well, I’ve sewed it up and it fits, sort of. Is it supposed to feel like it’s gonna fall off? 🙂 Anyway, gonna do the collar next. Been thinking about those buttons, though. Might only do one at the top. I’m not exactly a small person and don’t think it would look right buttoned over my belly. But, with a button up top, it might make it feel more like it’s staying put. Or, maybe the collar does that. As soon as I’m completely finished, I will post a pic on flickr or somewhere. Wish me luck! It is nice and warm; just what is needed here in WV where temps have plummeted and they are calling for snow. Snow in April! Almost unheard of around here.
Lion Brand Notebook
[…] Moderne Jacket Crochet-Along: Putting Together the Pieces […]
sheila
Hello!!!
Your vest/jacket is beautiful. I know how to crochet, but my problem is, I do not understand the patterns.
What stitch are you using? Is it SC or DC?
Thanks,
Sheila
Zontee says: Hi Sheila, the pattern stitch is neither SC or DC. The directions are as follows:
PATTERN STITCH
Ch 1, turn, sc2tog over first st and ch-1 sp, *ch 1, sc2tog over next st and ch-1 sp; rep from * to last st, ch 1, sc in last st.
Rep this row for Pattern stitch.
If you need help with what different terminology mean in directions, check out our Abbreviations Guide.
Frances
I need a copy of the Moderne Jacket please send me a copy. My email address is dblount@andycable.come Thanks
UGGS Outlet
Just wanted to give you a shout from the valley of the sun, great information. Much appreciated. Great