
 How exciting to be nearing the finish on this project! I’m thrilled with the finished bags I’ve seen so far, and very happy people are succeeding with this project.
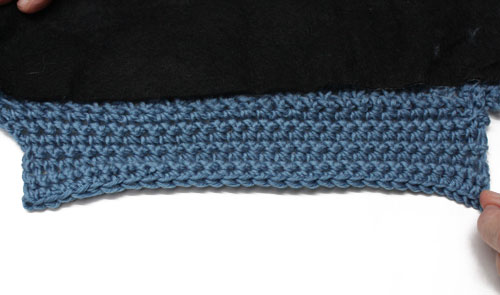
Today I’d like to discuss making the flap for the handle, attaching the handle to the bag, and then joining the front and back with a slip stitch seam. The flap is simply a piece of fabric we make along the top edge of both the front and back of the bag. It will fold over the handle and then be attached to the inside of the bag near the top edge. For the bag to hang correctly from the handle, the flap must start out the same width as the top edge of the bag. It needs to be long enough to fold over the handle and reconnect with the top of the bag again.
[Editor’s note: click here to see two wooden purse handle options–perfect for this bag–that are available on LionBrand.com.]
First, join yarn to the right top edge of either the front or back piece, not at the very outside edge, but one row in, before the all-bobble row (row 17), in other words, at the beginning of row 16. Work evenly spaced single crochet stitches along the top of the bag (32 stitches in all), ending at the end of row 16 on the left side. In my original, the handle is very close to the same size as the top edge of the bag, so I decreased only once, on row 3, to make it a bit smaller. Rows 4 – 6 are the part of the flap that will fold over the handle and are worked even. In the pattern, the decreased stitches are added back again on row 7. Here’s a look at my finished flap:
Several people in the CAL group on Ravelry have used handles that are not as wide as mine. If you want to go that route, you can still work the flap as in the original. When you fold the flap over the handle, the fabric will gather a little, which is perfectly OK. Or, you can make the flap a bit smaller by decreasing at each edge of the handle on rows 2 and 4, working two stitches together at the beginning and end of each row, just as is done on row 3. Work row 5 even, then make sure you add on the stitches again by making an increase on each end on rows 6, 7 and 8, ending with 32 sc on row 8.
Once you’ve completed the flap, fold it around the bottom of the handle, then pin it on the insider to the bottom of the first row of the flap. With a tapestry needle and yarn, sew the flap down to the inside of the bag. Then do the same exact procedure for the second handle on the bag’s second side. It’s a lot easier to do this before connecting the two sides of the bag–trust me!
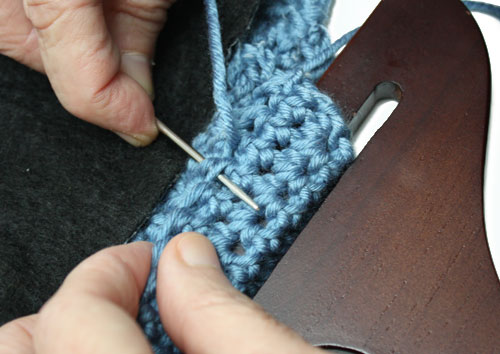
Our last step is joining the front and back. It’s done with a simple slip stitch seam, worked from the Right Side of the bag. I generally prefer to seam with the Right Side of the work facing, so I can tell exactly how my finished seam will look.
What’s important in making a nice-looking slip stitch seam is 1) matching stitches on the two pieces to be joined 2) controlling tension on the slip stitches. Hold the Front and Back together with their Right Sides facing out. Using safety pins, pin them together at a few points – each end, the center, and a couple more. To begin your slip stitch seam, leaving a tail of about 6″ (which will be used to secure the seam), draw the yarn through the first stitch on the front AND back pieces.
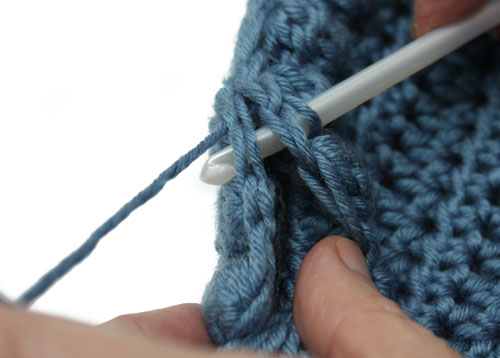
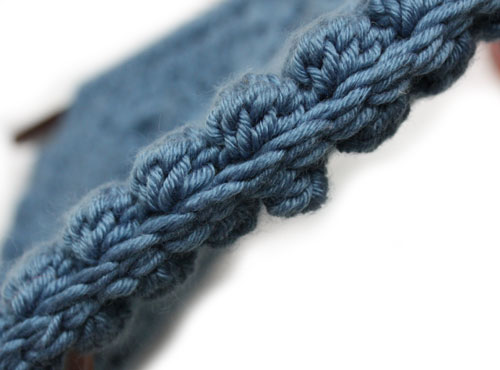
Now insert the hook into the 2nd stitch on both pieces, yarn over, and draw a loop through. Depending on how tightly you pull the tension of the yarn as you draw it through, the slip stitch will be larger or smaller. You want it to be just slightly tighter than the tops of the stitches you are working into, but just a bit. If you make the slip stitches too tight, it will distort the edges of the bag. Use your eye as a guide. Work your way all around the bag in this manner, and after the final stitch, end off leaving another 6″ tail. You’ll see that the seam is visible and rather attractive, in my opinion.
The beginning and end of this seam will get a certain amount of wear and tear, every time you open and close the bag. For this reason, it’s wise to make the ends very secure and tight. Place one tail on a tapestry needle, and work a short little seam along the top edge connecting the bobble on the front to the bobble on the back. You can make the stitches here tight and close together, as they should disappear into the fabric. Reinforce the last stitch by working into the same place 3 or 4 times, then weave in the end securely. Repeat on the opposite tail and voila! You’re done!!
I hope you enjoyed making this bag, and that you’ll get even more pleasure from using it!
Related links:
You must be <a href="https://blog.lionbrand.com/wp-login.php?redirect_to=https%3A%2F%2Fblog.lionbrand.com%2Fhalf-medallion-bag-crochet-along-adding-handles-seaming-and-finishing-the-bag%2F">logged in</a> to post a comment.
Boricuacrochet
I’ve received many compliments for the bag. Thank you for the pattern. It was fun making it in this CAL.
Jessica Leete
I am still waiting for my handles in the mail…I hope they get here soon. Â I am anxious to finish my two purses and be able to use the final product!
Mrs M
Where do I find previous crochet along projects?
Zontee
Hi there, you can review all of our previous crochet-along blog posts (and therefore all of our projects) by clicking on “crochet-along” under “Categories” in the left-hand bar. Hope that helps!
Marcy
I am looking for a crochet pattern for a curly scarf , all i have seen are knitted. Any help would be appreciated. Â Thank you
Zontee
Hi Marcy, just go to LionBrand.com and type “crochet curly scarf” or “crochet spiral scarf” to pull up our free patterns.Â
Also, please note that we ask that all comments posted here on the blog relate to the blog posts on which they are posted. If you have general questions, please go to LionBrand.com and click on “Help” so that we can direct your question to the right place.Â
Hope that helps!