
 Hello everyone! I hope everyone’s projects are still going well. The good news is that we’re coming close to finishing our shrugs, and after next week we’ll be done and able to wear them! At this point, we have finished the upper and lower half and completed the finishing border on the lower half. This week I am going go over the beginning of the finishing of your Glittery Shrug, which is the upper half border and the blocking. The border on the upper half uses the same front and back post double crochet stitch that the cuffs use. After doing the upper half border, you will be completely prepared to do the sleeve cuffs next week!
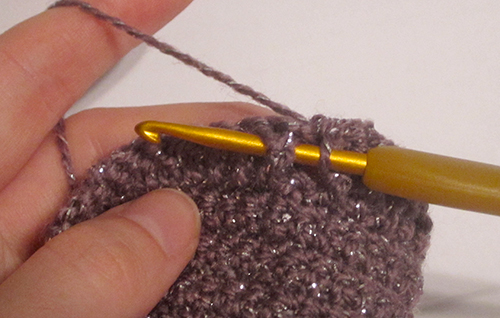
The upper half border starts with one plain row of single crochet and then one row of double crochet. The pattern calls for two single crochet stitches in each of the mesh stitches. This means you will be working two single crochet stitches into each chain space along the edge of the upper half. When you get row 3 of the edging, the special stitches are abbreviated as BPDC for the back post double crochet, the first of the two stitches that you will be working, and FPDC for the front post double crochet, the second of the two stitches. The difference between a standard stitch and a post stitch is that in a regular stitch, you are working horizontally, inserting your needle underneath a little “v” along the surface to create your stitch. With a post stitch you are working the around the base of the stitch from the previous row instead of in the top of this stitch. This is quite easy with the double crochet, as it is a taller stitch, and easy to work around the post.
Both the BPDC and the FPDC are working around the same part of the stitch, just in different directions. The first stitch is the BPDC. For this, you first yarn over the hook. After all, you’re still working a double crochet! Then you insert the hook from back of the fabric, pointing out towards the front. Your hook will be on the right side of the vertical post. Point the hook to the left, across the front of the post and out towards the back of the fabric. Then, keeping your hook in this position, complete the double crochet stitch as normal.

The FPDC is the same idea, but you’re inserting the hook the opposite way. Insert the hook from the front of the fabric, point the hook to the left, across the back of the post and come out on the front side on the left of the hook. Then, complete the double crochet stitch as normal. That’s all there is to post stitches!
After you are done with the border, it’s time for blocking! Blocking is what you’ll need to do to ensure your piece is the correct size and shape. It also makes seaming a lot easier, prevents your pieces from curling, and evens out your stitches. Refer to the schematics in the pattern for the measurements you need to block your project to and take into account any changes you made to the measurements while crocheting.
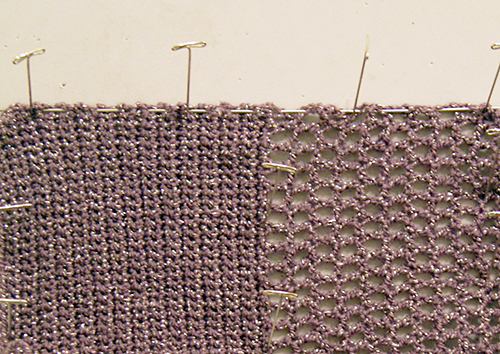
To prepare for blocking, first weave in all of your ends. If you weave them in before you bock, the blocking process will help to help keep the ends more secure in the fabric. Next, decide which tools you will be using. You will need t-pins or other stainless steel metal pins that will not rust when they get wet. I like to use foam blocking boards and blocking wires to assist with the process, but you may prefer to use towels along with rugs, couch cushions or a mattress. Having blocking boards makes the process easier since you can put the jigsaw puzzle like boards together to create the shape you need for your piece. I’ve used rugs and mattresses to pin larger pieces onto, and I’ve used couch cushions in a pinch, but you don’t want to ruin your furniture! Just make sure you use a towel in between your project and whatever you’re pinning it onto to absorb the extra water. I also like to use blocking wires, as shown in the picture of my project pinned with a wire along the edge. Blocking wires are made of a non-rusting metal and are inserted through straight edges of your project. This is especially useful with the long straight edges in this project. Using blocking wires means you need fewer pins to keep everything straight, and they really help to keep with more drapey double crochet fabric edges in check.
Once you have your materials, you can decide what method of blocking you would like to use. If you are using Vanna’s Glamour or another acrylic, I would recommend steaming with an iron. Acrylic steams very nicely and makes the fabric softer, which is especially useful with dense single crochet! Steaming also allows you to pin your project down while it’s dry instead of pinning it after soaking. To make sure your piece is extra damp and blocks better, you can also use a spray bottle to spritz some extra water onto the pinned piece before steaming. Most household irons have a steam function. Just know that you don’t want to touch the iron plate to your piece! Nobody wants flat, lifeless fabric. Hold the iron as close to the fabric as possible without touching, and go over the fabric completely several times to make sure the steam really permeates. After you’re done steaming, let your project dry overnight to make the fabric is dry all the way to the core.
If you are using a yarn that contains alpaca or mohair for your project (or any other wispy, fuzzy yarn), then you will not want to steam it, as the heat will make the fabric very limp. Instead, wet blocking is the best choice for this. Let your project soak in a yarn-safe wash like Soak or Eucalan wool wash, and then after it’s done pin it down to dry. If it is humid where you live, you may need to keep it pinned for at least 48 hours before it dries completely! Have your pieces dry for next week, as we’ll be talking about seaming and finishing the cuffs!
Related links:
You must be <a href="https://blog.lionbrand.com/wp-login.php?redirect_to=https%3A%2F%2Fblog.lionbrand.com%2Fglittery-shrug-crochet-along-frontback-post-stitches-and-blocking%2F">logged in</a> to post a comment.
Lstrader
I have tried all over to find the blocking wire – could you help???
Vanessa on Etsy
If you’re in the New York City area, the Lion Brand Yarn Studio has them, otherwise, try an internet search for “blocking wires.” Â There are websites out there that have them!
Lynne
Are you supposed to block each piece and then sew the garment together?Â
Zontee
Hi Lynne, many people block before seaming so that the pieces are smoothed out and easier to work with. However, you can also block a garment once you’re finished if you prefer.Â