
 Hi everyone! This week is going to be all about sleeves. In this pattern, the sleeves are put on hold until the body is completed. Then, the sleeve stitches are slipped back on the needle, and the ribbed border is started for short, t-shirt-length sleeves.
I decided that I’d like to do full-length sleeves. Lengthening your sleeves is pretty easy, especially if you’d like a casual looking sleeve with no shaping–just keep working until the sleeve is as long as you’d like it to be. However, I wanted more fitted looking sleeves, so I measured around my upper arm, just below my elbow and then around my wrist. Next I took vertical measurements to get the distance between those 3 points. Then, to work out how many and where my decreases should fall, I just used the same formula from my last post that I used for decreasing for the waist. For the sleeves, you’ll only be decreasing twice in each decrease row, once at each edge, rather than the four decreases across a row for the body. I placed my decreases two stitches in from the edge, to leave the edges nice and neat for seaming later on.
If you’d like to avoid a long seam, you can knit your sleeves in the round. You can just slip your sleeve stitches from the holder onto double-pointed needles and start knitting in the round instead of back and forth. This way, you’ll only have a tiny seam under your arm to sew at the end. Be aware, however, that your gauge can change from knitting flat to knitting in the round, so another swatch (worked in the round) is advisable. I find that whenever I switch from knitting back and forth to knitting in the round, my gauge is much tighter, necessitating a larger needle.
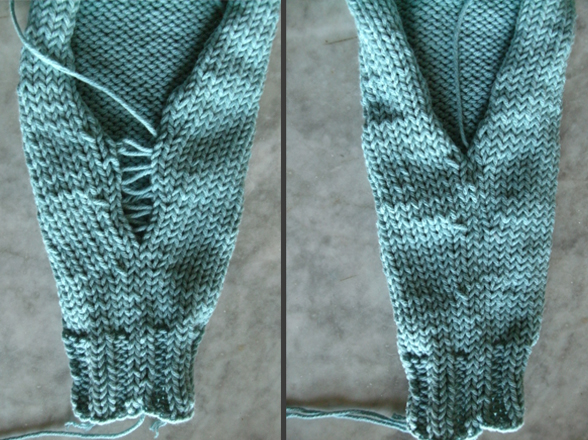
I like to use the mattress stitch to sew the seam. To do the mattress stitch, thread a darning needle with a piece of the yarn used for your sweater. The strand of yarn needs to be about twice as long as the seam is. I find it helpful to pin my two sides together at a few points along the seam before beginning to sew. You will do the mattress stitch with the right side of the fabric facing; this ensures that the seam will be hidden inside.
To begin, start at the cuff of your sleeve. Take your darning needle and put it through the middle of the edge stitch on the left side of your sleeve, then draw a kind of figure eight with the yarn, bringing it through the edge stitch on the right side and then back through the stitch you started with on the left side. This connects the pieces so that you can now start seaming. Next, gently pull apart the edge stitch and the next stitch in on the right side. You will see little horizontal bars that connect these two stitches. These are called running bars. Put your darning needle under two of the bars, then put your darning needle under the two corresponding bars on the left side. Continue in this manner, going from side to side under two bars each time, never skipping bars, until the entire sleeve is sewn from cuff to underarm.
Now you will notice you need a small seam under the arm on the body of your sweater. This was where you did the bind off stitches on either side of the sleeves stitches just before dividing for the body. To sew this seam, use the same piece of yarn, but this time work from the underarm down. Place the two bound off sides together so that the points of the V shape of the knit stitch are pointing in the same direction. Take your darning needle and go under the two strands of the V on one side, then under two strands of the opposite V on the other side. Do this until all the stitches have been sewn together. Then you can just weave in the ends of the yarn on the inside of your sweater.
I know that seaming can be a little intimidating, but I hope you won’t find it as difficult as you imagined it would be!
Next week, I’ll be going over how to pick up stitches for the front bands and how to add buttons and buttonholes. As usual, be sure to leave a comment and let us know how your project is coming along!
Related links:
You must be <a href="https://blog.lionbrand.com/wp-login.php?redirect_to=https%3A%2F%2Fblog.lionbrand.com%2Fcustom-raglan-cardi-knit-along-week-4-all-about-sleeves%2F">logged in</a> to post a comment.
Christine
 I am planning to knit the sleeves in the round. Good tip to check gauge. Thanks. I have been enjoying this project, it’s turning out well. I’m using Lion Brand Cotton Ease in Terracotta. Love the yarn and the color!
My first knit along | Bubblegirl
[…] the same pattern. Â Lion Brand is hosting a knit along this March by posting instructions on their blog each Thursday. We are making a Simple Cardi and the blog posts are showing us how to customize the […]
Ccccchayes
I finished my sweater. I had actually started to knit this sweater before the knit along started. I made mine just a little longer in the body. I would like to make this sweater again and put the cable pattern down the front as you suggested a week or two ago. Anyway, I used Vanna’s Choice, I love the feel of the sweater. I do have a question on how you are to block the sweater.
KALhostLauren
 I will be covering how to block this sweater in the next blog post.
Sylvia
So enjoying this project, I’m knitting mine a little longer with the cables but using the pattern rib when I get there, will definitely do this again. My sleeves will be short but longer than the pattern.
Baknitter
Having a lot of fun with this. Â Am still working on the increases, slow going, have several other projects going. Â Not sure how long I am going to make the sleeves and sweater. Â Will figure that out when I come to it.
Eileen
It’s a rainy Sunday. I have a pot of ginger tea with Dowton Abbey streaming on my Kindle Fire and almost finished with the increasing….hope to make some good progress today. Love doing this sweater and love the feedback and help.
Anonymous
 Love Downton Abbey!
Anonymous
i have finished my cardi love it even with all the imperfections {started knitting in jan. this is my first garment}
love the pattern perfect for the novice knitter. thanks to every one for their ideas and pictures of their garmentÂ
Anonymous
I’ve fininshed my cardi and I just love the pattern. It lends itself well to doing varietions. I am waiting to see how you do a button hole as I was considering adding a button but could not quite figure out how to because of the horizontal knit along the edge. Waiting for the how – to. Thank you . Looking forward to another KAL.
Carolee
HI all, yeah to all that are done. I made a huge mistake!!! I stoped in the middle of the row, something I never do !! when I picked it up again I thought I was knitting and ended up with a hole like a droped stich. I knew I hadnt droped a stich.  just figured the yarn had streched out and finished knitting the row and statred the purl row got on top of the hole and realized what I had done !!!! I was on a purl row when I last put it down !!! OMG now I have to knit back or RIP two rows @ 292 sts per row now Trying hard to keep wanting to do this !!!! UG  Â
KALhostLauren
 Hi Carolee,
When you stop in the middle of a row, always remember that your working yarn should be attached to your right needle.
Hope this helps!
Tjcoll
good tip. thanks
Carolee
Lauren, thanks for the tip. It only took about a hour to undo my mess. I felt good that I was able to figure out my mistake tho. I am back on tack and loving this sweater !
Anett
Hi everyone! Getting close to finishing the cardi – cute so far! I have a question about sewing the sleeve seam. After you sew up the sleeves and get to the small seam under the arm, is it best to cut the yarn and start over from the other side, or is it OK to weave the yarn through and then sew from the other side. Does that make any sense at all? If it does, I’d really appreciate some help!!! Â 🙂
KALhostLauren
 Hi Anett.
I just carried on with the yarn I used to sew up the long sleeve seam, but if you feel it would be neater to cut the yarn and then start the small underarm seam, you should do that.
Whatever works for you!
Anett
Thanks for your help, Lauren. I went ahead and continued the seam with the same yarn and it turned out fine!
Mowelborn4
Lots of fun knitting this sweater!! I’ve made mine longer, past my hips, and am now working on the sleeves. Looking forward to the next blog. I’ve never “picked up” stitches so should be interesting. Happy knitting!!
Zz
I completed my cardi in eight days and I love it. This was my first knitted raglan cardi and I found the pattern easy to follow. The only difficulty I had was at the bind off section for the body divide. The pattern states…”bind off next 3 sts (the yo, k1, yo)…”. I did the bind off and continued to do the knit 55 for sleeve.  When doing the bind off should the yarn be cut and would you join yarn for the knit 55 sleeve section? I plan on making more of these so any help would be greatly appreciated. A picture would be very helpful!
June
i have just started transferring the stitches from the stitch holder to my needles for the sleeves.
Do i work back and forth or work in a round?
Zontee
Hi June, since the pattern says “rows” instead of “rounds”, you’ll be working back and forth. Hope that helps!