
This column by Barbara Breiter, author of The Complete Idiot’s Guide to Knitting & Crocheting, originally appeared in The Weekly Stitch newsletter.
An increase adds stitches and creates shaping as a general rule. Lace patterns will use increases to balance decreases and you usually end the row with the same number of stitches you started with.
Many times, the pattern will tell you which specific increase to use; this is especially true with lace patterns. If the pattern tells you to simply increase, use the default increase: knit in the front and back of the same stitch (usually abbreviated kfb).
When working an increase in shaping, such as making sleeves wider, work them at least one stitch in from the edge. This makes seaming much easier.
Let’s take a look at some various ways to increase (click on any highlighted text to see diagrams:
As mentioned earlier, this is the default increase. It’s sometimes called a bar increase as it leaves a noticeable “bar” of yarn from the original stitch as it’s manipulated twice. It does not distort and it’s a perfectly fine increase except for the bar. If you don’t look closely, it will not be noticed.
The yo leaves a decorative hole. It has many uses and you will often see it incorporated in lace knitting and borders for blankets and scarves. The trick to knitting the yo is to make sure that after you wrap the yarn, you don’t lose the wrap as you knit or purl the next stitch. It’s very easy for it to fall off the needle by accident. So use caution!
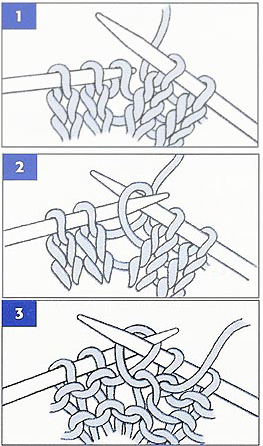 This is sometimes called the invisible increase. It’s a bit more difficult than the others but nothing that can’t be mastered with a bit of practice. There are several ways to do it.
If your pattern does not specify a particular M1, the following is the default version. It creates a small hole. Insert the tip of the right needle into the horizontal strand between two stitches in the row below from front to back. Transfer the strand to the left needle and knit into the back of it. Remove from the left needle as usual.
The second version does not create a hole: It’s worked in the same way but knit into the front loop instead (as you would a regular knit stitch). This increase slants to the right.
The third way to M1 starts out differently. When you insert your needle into the strand, do so from back to front (the needle will be moving toward you) instead of front to back. This results in the strand being twisted when it is placed on the left needle. Now knit into the front loop of this strand (the usual knit method). This version does not create a hole and it will slant to the left.
Sometimes a pattern will ask you to knit in the stitch below instead of the next stitch; it produces a stitch that pulls up and elongates and provides a rich texture. However, sometimes you will be told to knit in the stitch below to increase. Be sure if you are asked to knit in the stitch below, you carefully follow if you are increasing or not.
This increase is almost invisible. Usually you will knit in the stitch below and then knit the next stitch. Because this increase elongates the piece, do not use it more than once every four rows or so. You should not substitute it for other increases called for in a pattern.
Literally work into the stitch in the row below. Look carefully and insert the right needle into the center of this stitch and knit as you normally would.
Used in a variety of situations, most commonly you will be asked to (k1, p1, k1) in the same stitch or (k, k through the back loop, k) in the same stitch. These are just variations of the standard bar increase (kfb). For the latter, it’s just an extra knit in the usual manner before the stitch is removed from the left needle. To (k1, p1, k1) in the same stitch, knit in the usual way but don’t remove the original stitch from the left needle. Now purl in the same stitch and again, don’t remove it. Finally, knit once more and remove the stitch in usual way.
–-
To sign up for the Weekly Stitch and get columns like this, free patterns, how-to videos and more, click here.
You must be <a href="https://blog.lionbrand.com/wp-login.php?redirect_to=https%3A%2F%2Fblog.lionbrand.com%2F5-ways-to-knit-increases%2F">logged in</a> to post a comment.
5 Ways to Knit Increases | Yarn Buyer
[…] http://blog.lionbrand.com/2014/05/26/5-ways-to-knit-increases/ […]
Anne Campbell Slater
I have a pattern for knitting a starfish which includes instructions to “m1r” and “m1l” (make 1 to the right/left). I’ve been knitting for 52 years and have never come across this instruction. Help?!
Zoë Williams
Hi Anne. These are the same as the 2nd and 3rd variations of M1 above. Right and left refers to the slant of the increase.