
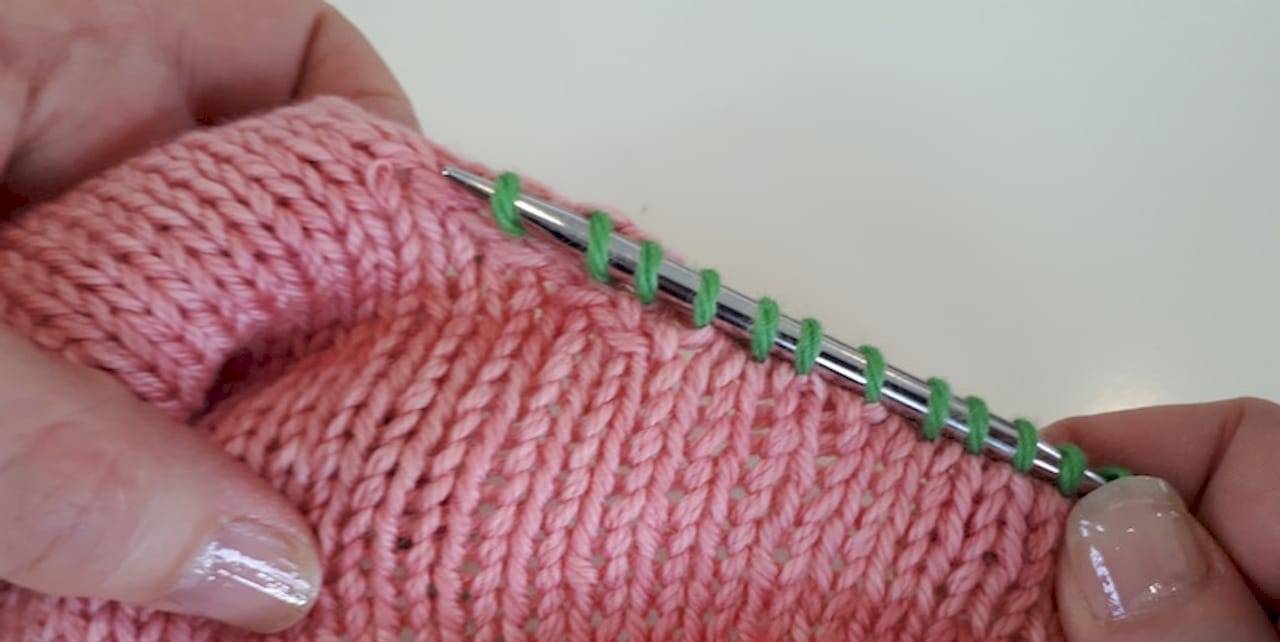
3 Quick Swatches to Master Picking Up Stitches in Knitting
Picking up stitches means creating live loops from the edge of finished knitting so you can add new fabric, like a buttonband, collar, or sock heel. Plain “pick up” transfers existing loops onto a needle with no new yarn involved, while “pick up and knit” uses your working yarn to form a brand-new stitch at each spot. This guide covers both edges and every angle you’ll run into, plus the spacing math, the fixes for common errors, and a handful of Lion Brand patterns built for practicing the skill.
Proper ratios for side edges depend on your stitch and row gauge, with common starting points like three stitches for every four rows in stockinette fabric.
Using a smaller needle size than your main fabric helps create a neat, tensioned edge without puckering or looseness.
Practice on swatches and divide edges into quarters with markers to ensure accurate stitch counts and even spacing before working on actual projects.
When picking up stitches around curves or angles, adjust ratios based on the shape, typically 4:5 for diagonals and one-to-one for straight edges.
Two pickup methods exist: either gather all stitches first then work across or pick up and knit simultaneously, with the latter being faster once you’re comfortable.
Table of Contents
Two Ways to Pick Up Stitches: Which Method Fits Your Project?
What Are the Most Common Pick-Up Mistakes and How Do You Fix Them?
Practice Drills to Build Confidence Before Your Next Project
Why Finishing Discipline Separates Good Knitting From Great Knitting
What’s the Difference Between Pick Up and Pick Up and Knit?
The terms get used interchangeably in casual conversation, but they describe two different actions with two different results on your needle.
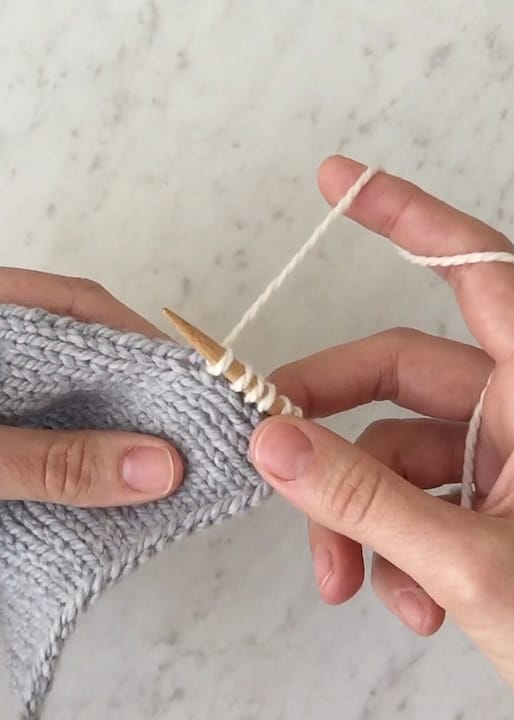
Plain pick up means slipping an existing stitch or loop directly onto a needle, no yarn required. You see this most often in provisional cast-ons or when transferring stitches that are being held on scrap yarn. Pick up and knit is the far more common technique for garment finishing: you insert your needle into the fabric, wrap your working yarn around it, and pull through a fresh loop, exactly the way a regular knit stitch forms. According to Wikipedia’s overview of the technique), pick up and knit is the method for adding new fabric directly onto the edge of completed knitting, since it produces a genuinely new stitch rather than relocating one that already exists.
The visual difference shows up immediately. Plain pick up leaves you with whatever loop shape already existed, which can look slightly irregular. Pick up and knit gives you a fresh, uniform stitch every time, which is why patterns default to it for buttonbands, neckbands, and sock cuffs.
A few practical notes worth keeping straight:
Patterns will explicitly say “pick up” or “pick up and knit,” so read the instruction carefully before you start.
Joining new yarn for a pick-up-and-knit edge doesn’t need a knot. Leave a short tail, wrap it around the needle for your first stitch, then knit the second stitch catching both tail and working yarn before dropping the tail, a trick Modern Daily Knitting recommends for a secure, bulk-free start.
If your pattern does not specify which method to use, pick up and knit is generally assumed as the standard for garment construction.
How Do You Pick Up Stitches on a Cast-On or Bound-Off Edge?
Cast-on and bind-off edges are the friendliest place to start because they give you a clean row of bumps to work with, and the ratio is almost always one-to-one.
On a standard bind-off, you will see a row of chain bumps running along the top of the fabric. On a long-tail cast-on, use the same approach along the bottom edge, catching the full loop to maintain a neat join.
Here’s the repeatable sequence:
Identify your landmark row, either the chain bumps of a bind-off or the loops of a cast-on, and decide whether you’re picking up from the top or bottom of that row.
Insert the needle under both strands of the first stitch, not just the front leg, for a mount that matches the rest of your fabric.
Wrap the working yarn and pull through, forming one new stitch.
Repeat once for every single stitch along the edge. This is a strict one-to-one count, unlike side-edge pickup.
Count your total against the original cast-on or bind-off count before moving to the next row.
Pro Tip: If your original cast-on used a fussy method like cable cast-on, the bumps can sit unevenly. Pick a consistent landmark, always the top bump or always the bottom loop, rather than switching partway through, and the edge will read as uniform even if the original cast-on wasn’t perfectly tidy.
If you find yourself off by a stitch or two at the end, don’t panic and don’t rip back yet. Small discrepancies on a CO/BO edge usually mean you missed a bump or doubled up on one. Scan the edge visually before adjusting your count on the next row.
How Do You Pick Up Stitches Along a Side Edge?
Side edges, sometimes called selvage edges, are the trickiest because rows and stitches are not the same shape. A knit stitch is wider than it is tall, so if you picked up one stitch for every row along a vertical edge, the trim would ruffle and flare outward.
Modern Daily Knitting explains that a ratio approach solves this, with 3 stitches for every 4 rows as the standard starting point for stockinette fabric at typical gauge. That ratio isn’t universal though. Garter stitch, with its denser row height, often wants something closer to 1 stitch per garter ridge, and a heavily textured fabric may need its own test run.
To find your actual ratio:
Measure your row gauge and stitch gauge from your swatch or fabric.
Divide stitch gauge by row gauge to get a rough starting ratio, then round to something workable like 3:4 or 4:5.
Pin or mark the total edge length in inches and multiply by your target stitches-per-inch to get the number you’re aiming for.
Once you know the number, divide the edge into quarters using removable stitch markers, a common method to catch unevenness early. If your count is off by a few stitches, work an increase or decrease into the first row rather than undoing the entire pickup.
One catch worth flagging: if your edge was slipped on every row rather than knit normally, you’ve effectively halved your available anchor points, which can make a dense ratio like 3:4 impractical without stretching the fabric. Check your selvage type before committing to a ratio.
Pro Tip: Work with the fabric flat on a table rather than in your lap. Side-edge pickup is much easier to judge for evenness when you can see the whole span at once instead of a curled-up section in your hands.
How Do You Pick Up Stitches Around Curves and Angles?
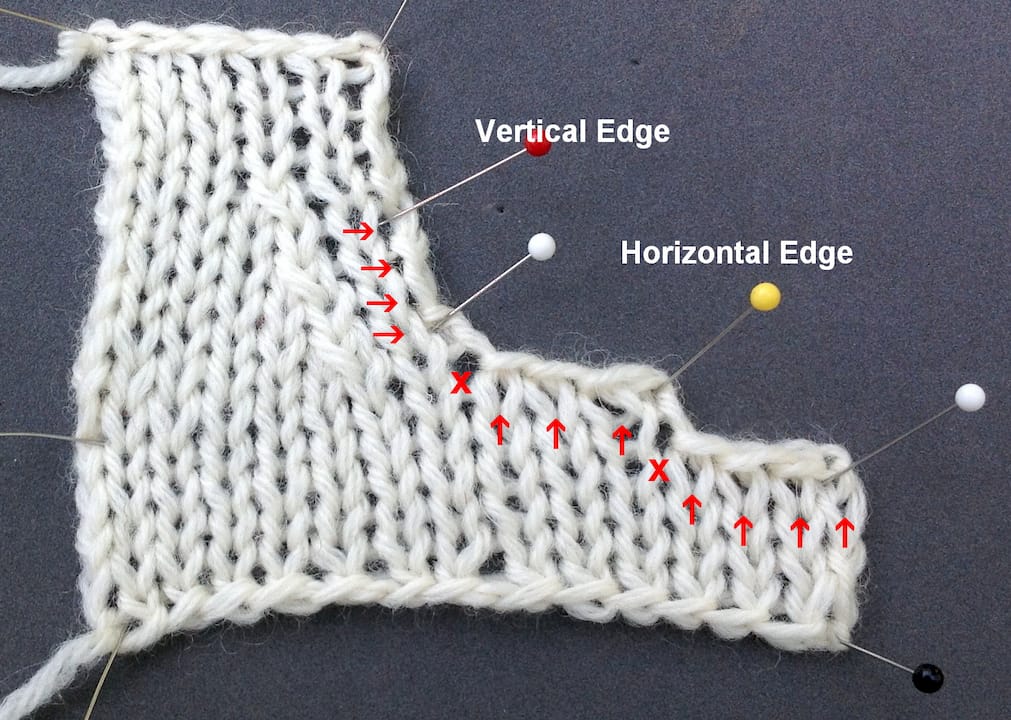
Necklines, armholes, and any shaped edge with a mix of straight sections, steps, and diagonals need a hybrid approach: different ratios for different segments of the same edge.
Break the edge into its component shapes before you start. A center back neck that was bound off straight across gets the one-to-one treatment, same as any other bound-off edge. The vertical sides of an armhole, where stitches were simply worked straight up, get the side-edge ratio treatment, typically 3:4. The diagonal or stepped sections in between are where most knitters run into trouble.
For gently sloped diagonals, a ratio around 4:5 usually keeps the edge from puckering or flaring.
On stepped bind-offs (common in set-in sleeve shaping), avoid picking up directly into the largest gap at each step. Choose a snugger neighboring stitch instead, a fix corroborated by Modern Daily Knitting’s technique guide, since the oversized gap at a step will leave a visible hole no matter how carefully you insert the needle.
If after applying the appropriate ratio the stitch count is still short, add easing increases on the first worked row instead of forcing extra stitches into insufficient spots.
Curved edges, such as rounded necklines, combine side-edge and diagonal guidelines: treat the tight curves like diagonal edges with suitable ratios, and the straighter sections like side edges. While this may seem complex in writing, the fabric usually indicates the best placement when you begin working.
Two Ways to Pick Up Stitches: Which Method Fits Your Project?
There are two workable sequences for turning an edge into live stitches, and knowing which one your pattern (or your instinct) is asking for saves a lot of frustration.
Method A: Pick up everything first, then work across.
Attach your working yarn with a slip knot or the anchoring trick described earlier, and pick up every stitch across the entire edge before knitting a single row.
Once all stitches are on the needle, check the mount. Every stitch should sit the same way, with the right leg forward, so your first full row knits evenly.
Work your first row all the way across, paying attention to tension since this row sets the tone for the whole trim.
Continue in pattern.
Method B: Pick up and knit as you go.
Insert the needle at your first landmark point, wrap the yarn, and knit the stitch immediately rather than parking it unworked.
Move to the next point and repeat, effectively combining the pickup and the first row into one pass.
Use the short-tail anchoring trick at your starting point: wrap the tail around the needle for stitch one, knit stitch two catching both tail and working yarn, then drop the tail. Interweave notes this reduces stress on that first edge stitch, which is usually the weakest point on a finished trim.
Continue across the full edge in one continuous motion.
Method A gives you a chance to fix spacing errors before committing to any stitches, which makes it the safer choice for beginners or for edges with a tricky ratio. Method B is faster once you’re comfortable, and it tends to produce a slightly less bulky edge since you’re not holding unworked loops on the needle for an extended stretch. Astraknots’ tutorial also points out that a crochet hook can stand in for a needle during either method, which helps when you’re working into tight spots like the corner of a heel flap.
One more decision point: whether to pick up the full stitch (both legs) or just one leg. Full-stitch pickup gives a firmer, more structural join, ideal for buttonbands that need to hold their shape. One-leg pickup produces a slightly looser, more decorative edge, sometimes preferred for lace trims.
Pro Tip: If you’re new to picking up stitches, practice Method A on a swatch first. Seeing all your stitches lined up before knitting a stitch builds the muscle memory for spacing that Method B requires you to do on the fly.
What Needle and Tension Adjustments Work Best?
A picked-up edge that matches the tension of your original fabric doesn’t happen by accident, and needle size is the biggest lever you have.
Going down one needle size from what you used for the main fabric is a widely recommended trick for controlling looseness, especially on buttonbands and neck trims where a floppy edge undermines the whole garment. The pickup process itself tends to stretch stitches slightly, so a smaller needle compensates for that natural give.
Before committing to a full edge, pick up a handful of stitches, say ten, and knit one row. If the fabric puckers, go up a needle size. If it looks loose or wavy, go down one. This ten-minute test saves you from ripping out an entire buttonband later.
Useful tools to keep within reach for any pickup session:
Stitch markers, ideally removable ones, for dividing long edges into quarters.
A tapestry needle for weaving in the tails once your edge is complete.
A crochet hook, which can pull loops through tight or twisted spots more easily than a straight needle.
Waste yarn, handy if you need to hold stitches temporarily while you sort out spacing.
Rushing this stage is the single most common cause of a sloppy edge. Taking the extra few minutes to space and anchor each stitch deliberately, rather than speeding through, is what experienced teachers consistently point to as the difference between an amateur-looking trim and a professional finish.
What Are the Most Common Pick-Up Mistakes and How Do You Fix Them?
Even careful knitters run into the same handful of problems. Here’s how to spot and repair each one.
Missed or skipped stitch: If you notice a gap a few stitches back, you don’t have to rip out everything. Pick up one extra stitch nearby and work a decrease on the next row to absorb it, or ladder down with a crochet hook to fix just that spot.
Too loose or too tight: Loose stitches usually mean the needle was too large or you picked up under only one leg where two were needed. Rework the affected section on a smaller needle rather than the whole edge.
Puckering or flaring: Puckering signals too many stitches for the row count; flaring means too few. Recheck your ratio against the actual edge, not just the pattern’s suggested number, since gauge differences shift the math.
Small holes at transition points: A gap where a sleeve meets a body, or where two pickup sections join, can usually be closed with a duplicate stitch touch-up or a small graft using the tail end, without reworking the whole area.
Pro Tip: Keep the working yarn tail long enough (about six inches) when you start a pickup section. That tail becomes your built-in repair tool if you need to graft or duplicate-stitch a trouble spot later.
Practice Drills to Build Confidence Before Your Next Project
Three short swatches will cover almost every situation a real garment throws at you, and none of them takes more than thirty minutes.
CO/BO edge drill: Cast on 20 stitches in worsted weight, knit a few rows, bind off, then pick up all 20 stitches one-to-one. Check that your final count matches exactly.
Side-edge ratio drill: Knit a swatch about 16 rows tall, then practice picking up using a 3:4 ratio, dividing the edge into quarters with markers first.
Curved corner drill: Bind off a few stitches in the center of a row to simulate a neckline dip, then practice blending a one-to-one center section with angled sides on either edge.
Before starting any real project, run through this quick checklist: correct stitch mount (both legs unless the pattern says otherwise), even spacing confirmed with markers, consistent needle placement across the whole edge, and a final stitch count matched against the pattern. A worsted-weight, light-colored acrylic or wool blend makes these drills easiest to see clearly.
Lion Brand Resources for Practicing Picked-Up Stitches
Lion Brand’s free pattern library includes step-by-step guides on casting on, binding off, and fixing dropped stitches, all useful groundwork before tackling a pickup-heavy project. For hands-on practice, three patterns stand out as focused drills in disguise.
The Baby Log Cabin Afghan practices border and trim pickup along long straight edges, a direct rehearsal for the side-edge ratio work covered above. The Karlie Tank Top puts curved-edge pickup to work around a neckline and armholes, the exact scenario the angles section walks through. The Men’s Business Casual Socks pattern is a smaller-scale project for practicing circular pickups around a toe or heel join.
For yarn suited to trims and borders, machine-washable options like Wool-Ease Yarn or 24/7 Cotton Yarn hold their shape well at buttonband edges without the pilling that some fibers show after repeated wear.
Why Finishing Discipline Separates Good Knitting From Great Knitting
Picking up stitches is one of those places where the difference between a home-finished garment and a store-quality one shows up in inches, not yards. A buttonband that’s a half-inch too tight will pull a cardigan closed wrong. A neckline picked up with the wrong ratio will gap at the shoulder or choke at the throat. These are small choices with outsized consequences on fit.
The instinct to rush this stage is understandable. You’re near the end of a project, the bulk of the knitting is done, and picking up a hundred-plus stitches one at a time feels like a chore standing between you and a finished sweater. That instinct is worth resisting. The swatch test, the marker divisions, the tension check with ten trial stitches, none of it is glamorous, but it’s the difference between an edge that lies flat for years and one that you’re quietly annoyed by every time you wear the piece.
Treat picked-up edges as measurable, not intuitive. Count, divide, test, adjust. That’s not a lack of confidence, it’s how experienced knitters actually work, and it’s why their finishing looks deliberate instead of accidental. The technique rewards patience more than any other skill in the craft, and it’s worth practicing on a low-stakes swatch before you commit it to a garment you’ve spent weeks knitting.
Practice Projects That Put These Techniques to Work
Reading about picking up stitches only gets you so far. The fastest way to make the ratios and needle placement feel automatic is to work them into an actual project, ideally one small enough to finish in a weekend.
The Baby Log Cabin Afghan is built around border pickup from start to finish, so every technique from the side-edge ratio section gets real repetition. The Karlie Tank Top gives you curved-edge practice around a neckline and armholes without the time investment of a full sweater. The Men’s Business Casual Socks pattern is small enough to finish in an evening and covers the tight, small-scale pickups you’ll need for heels and toes on any future sock project. If you’d rather practice on a garment shape first, the One Stitch Adult Cardigan has a buttonband edge that’s a natural next step once the swatch drills feel comfortable. Pick one, grab a skein of Wool-Ease Yarn, and work through the pickup section slowly the first time. The pattern page for each project has the full stitch counts and gauge details you’ll need to get started today.
Sources
For a deeper technical breakdown of ratio calculations and stepped bind-off fixes, Modern Daily Knitting’s guide is the most thorough resource referenced throughout this article. Wikipedia’s entry on the technique offers a concise definition useful for confirming terminology. Interweave’s comparison of pick up versus pick up and knit clarifies the yarn-anchoring trick in more detail. JennyKnits’ edge guide is a helpful visual reference for identifying landmarks on slipped-stitch and cast-off edges.
FAQ
How do I pick up stitches in knitting as a beginner?
Start with a bound-off or cast-on edge, since the ratio is one-to-one and the landmarks (chain bumps or loops) are easy to see. Insert your needle under both strands of each bump, wrap your yarn, and pull through a new stitch, repeating once per original stitch.
What is the difference between pick up stitches and pick up and knit?
Plain pick up transfers an existing loop onto a needle with no new yarn, while pick up and knit uses your working yarn to form a brand-new stitch at each point, the way Wikipedia’s technique overview explains. Most garment patterns mean pick up and knit unless stated otherwise.
How do I pick up stitches along a side edge?
Measure your stitch and row gauge, then apply a ratio like 3 stitches for every 4 rows as a stockinette starting point, adjusting for garter or textured fabric. Divide the edge into quarters with stitch markers first to keep the count even across the whole span.
How do you pick up 2 stitches for every 3 rows?
Mark the edge into equal sections, then within each section pick up 2 stitches and skip the third row’s position, repeating the pattern consistently rather than clustering the skips together. This ratio suits a slightly looser trim than the standard 3:4, useful on garter or textured selvages where fewer anchor points are available.

