
 Welcome back to the Wisteria Pullover Knit-Along! My sweater pieces are knit and blocked, and I’m ready to get this pullover finished! In getting started to put mine together, however, I realized there are quite a few different finishing techniques involved and quite a large collar to knit, so I’m going to break the finishing work down into two posts, this week and next. Let’s get started on the shoulder seams and collar!
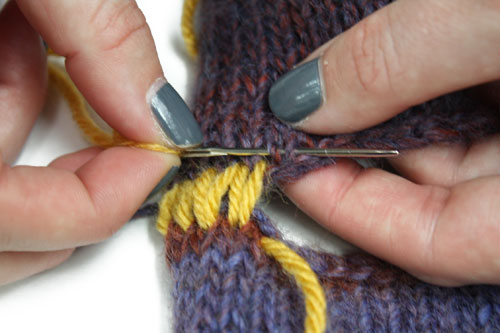
The first step is to seam the shoulders in order to create the back neck opening for the collar. To do so, I recommend a type of seam called the mattress stitch. There are three different types of mattress stitch: horizontal to horizontal stitches (side seams), vertical to vertical stitches (shoulder seams), and vertical to horizontal (the collar and part of the sleeve cap). As you can see, we’ll be employing all three along the way to finishing our sweater! Starting at the outside edge of your shoulder seam, pin your front and back pieces together and begin seaming, working your darning needle under both legs of the V on one piece and then under both legs of the V opposite on the other piece, as shown in the following image. I’ve used a golden yarn so that you can see the stitches, but keep in mind that these will be visible, so you should use the same yarn as for the main body. For more information on seaming click here.
I like to keep the tension of this seam similar to my knit stitches, instead of pulling it tight so that the seam looks like another row of stitches, but it’s entirely up to you. Here’s why mine looked like after seaming:
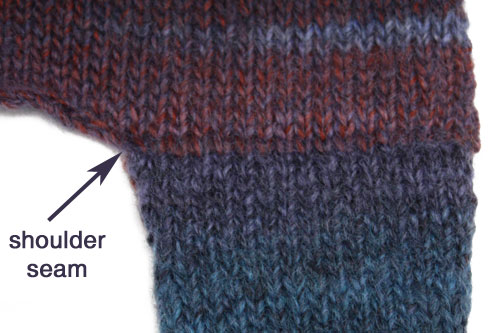
Repeat with the other side and voila! Starting to look a bit more like a sweater? Now you can start to picture where this collar is going to fit in. So now it’s time to pick up stitches to start knitting the shawl collar. The way the collar is constructed is this: you pick up and knit a certain number of stitches along the back of the neck and begin working in 2×2 rib; gradually more stitches are cast on at the beginning of both rows to elongate the collar but give it a nicely-shaped curve, then it is knit until it is wide enough to fill the gap we created in the front.
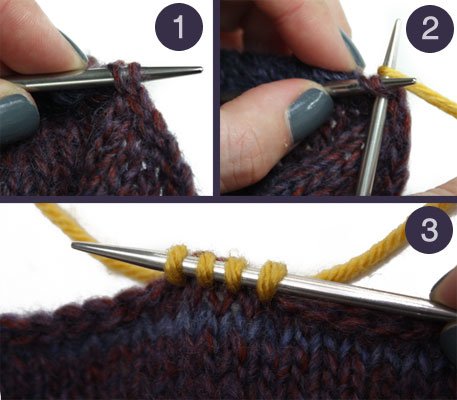
To plan mine, I counted how many bind-off stitches I had along the back of the neck opening and found I had 32 – 2 short of the 34 I needed to pick up. I accounted for this by picking up my first and last stitch from the shoulder join, then used the 32 stitches I bound off before ato get my 34 stitches to start the collar. Working from right to left, pick up and knit each stitch until you have the number required. By planning ahead, you can evenly space these stitches instead of getting to the end and having to stretch across or cram in a bunch of stitches. For more information about picking up stitches, click here. Here’s what the process of picking up and knitting looks like (again, I’ve used contrast yarn, but you’ll be using your main body yarn):
To add the stitches at the beginning of the row, one simple method is the backwards loop cast on. Click here for more information on how to do this cast on. Just as a word of advice: once you have your added stitches, the pattern says to work in K2, P2 rib as established – be aware that on your right side rows, you will need to start with 2 purls, or you will throw off the rib pattern.
If you made your neck opening deeper or more shallow, now is the time to adjust your collar length to fit your opening, keeping in mind the collar is sewn in with the ribbing slightly stretched. I worked the pattern as written, and my collar fit well. Although the opening looked very deep, it worked out very nicely. Keep working in 2×2 ribbing until the side edges of the collar are the same height as the bound-off opening in the neck, which for me was just over 4 inches. Remember the back section of the collar will be wider than this, which creates the shawl collar.
Now it’s time to sew it into place. We’ll be using a different version of the mattress stitch for this: the vertical-horizontal type. This method combines the technique of the other two versions: you work under the V of the vertical piece, then under the bar one stitch in from the edge of the horizontal piece, back and forth, then pull them together to make the seam disappear. Again check out the page we have about seaming by clicking here, where you can see what I mean between the different horizontal and vertical stitches (disregard the garter stitch seams since we have stockinette and ribbing.)
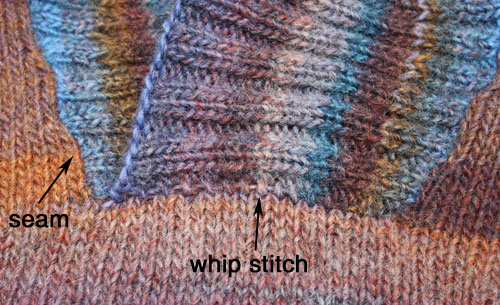
I chose to secure the bottom of the collar first, then attach it down each side so I could fit it in smoothly. I joined the left side of the collar (your left, the sweater’s right side) first, using a simple whip stitch between the side of the collar and the bound-off stitches of the neck opening, since this part of the seam will be covered up by the overlap. Next I attached the other side of the collar on top, carefully working my vertical-horizontal mattress stitch to make the join as invisible as possible, resulting in this:
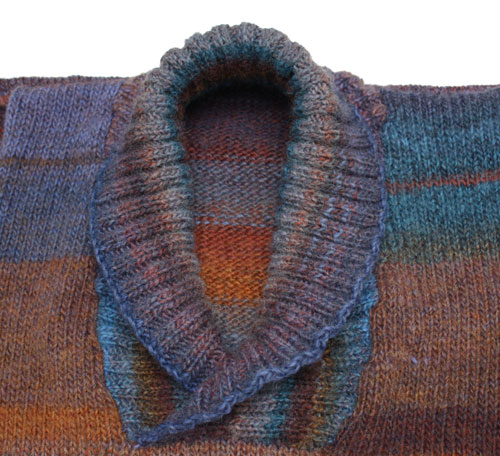
I applied the same type of seam to the sides of the collar, pinning the collar in place first: one in the middle, then two on either side of that, to ensure that I could make the collar lay flat and even. It takes some patience to make it look right, but it’s worth it! Here’s a picture of my finished collar and I couldn’t be happier!
As I mentioned last week, once I finished knitting the sleeves it was time to get those blocked and ready for seaming. As with the front and back of the sweater, it’s very important to have your pattern schematic and a measuring tape handy when blocking so you can shape and size the sleeves to the exact measurements you want in the finished piece and it makes seaming much easier. My sleeves are all pinned out and drying, ready for next week!
So enjoy your week and completing the collar of your sweater, and next week we’ll set in the sleeves and seam up the sides, then enjoy our finished pullovers!
Related links:
You must be <a href="https://blog.lionbrand.com/wp-login.php?redirect_to=https%3A%2F%2Fblog.lionbrand.com%2Fwisteria-shawl-collar-pullover-kal-working-the-collar%2F">logged in</a> to post a comment.
Grace Jones
Great work on your collar! I’m trucking right along on my sleeves now. I’ve got about 6 inches so far. Knitting them at the same time is nice except my yarn balls and end tails keep getting tangled.
Anonymous
Thanks! You are so sweet. Working two at a time can have that yarn tangling problem but it’ll get easier 🙂
Kathleen Brandenburg
I,m working hard and just finihed the back and started on the front. I am so excited, I chose the color Aurora and it is very nice. I have a question about Blocking. You mentioned that you used your blocking “Wires”, where do I get some of those. I loved the way it made the blocking so much more uniform. I hope you can answer this. I can also be reached at my email, kathsclan@aol.com, or on facebook under Kathleen Brandenburg. I love this project. I also made the CAL Raglan Pullover this summer and have compliments every time I wear it. I made a few adjustments but love it very much. Thank you for your continued help, I can’t wait to finish this beautiful sweater.
Katluverb
I ordered a set of blocking wires from Joann’s (www.Joann.com). They were about $25 for the set and I questioned spending the money but they have really been well worth it.
Scrapncynthia
I’m half way through the sleeves, they take longer than I expected. My front and back are blocking in my office right now. It’s my first time blocking a sweater. I had a bit of a scare when the measurements were off on the length, and then duh! I realized I had lengthened it by 2″ but didn’t take it into account on the schematic. Do we block the sleeves too? I’m nervous about the collar, but I’ll deal with it when I get there.
Not many posts…where is everyone?
Cynthia
Anonymous
Yep, I blocked the sleeves too. Everything! I too found the sleeves to take a while, but they do eventually end! Keep it up – the end is in sight! And as a break from the sleeves, you can work on the seams and collar before the sleeves are done if you want.
Shari
Just washed and blocked my front and back; this is the first time for me to try this. I found this to be a little more difficult than I was expecting. As careful as I was trying to be, the measurements, especially the length, seem to get bigger. Will the pieces contract a little as they dry? Was wondering if I should pin the pieces down or just lay flat?
Anonymous
Pin them in place, following the measurements. Did you wash your swatch? Some yarns do bloom or grow a good amount when wet, so do the best you can to put the pieces back into the intended measurements, pin in place and leave them be until completely dry.
Kelly Halley
I’m thinking that the collar might cause some trouble for me. I’m certainly not there yet but I’m hoping that someone will take pictures and post them here or on ravelry when you get there.  I’m not visualizing exactly how the collar is knit. If someone could take a few pictures (in progress) of knitting the collar, I would really appreciate it.
Anonymous
I meant to but got too excited when it was done and moved right on to sewing it in. Sorry! Basically it is attached along the back of the next where you pick up the stitches, but kind of like detached wings off the sides of that point until you sew it in. It’s not so scary when you get there, I promise!
Kathy
Oh, sadness! I added 2 inches to the length of my sweater as I was knitting along, and now, don’t have enough yarn to finish my collar….I’m about 1 inch short on length. So, I ordered another skein of yarn and am stuck waiting until it arrives to finish. I’m so happy with how my sweater looks! And I blocked my arms and had to settle on them being longer than the schematic…just couldn’t quite make them suck up to that legth. Thanks for all the tips and the fun project!
Darlene
I’m new to knitting but this site (and several others) have helped me a lot with this project. I’ve been meaning to thank you, Kendra, for the photos of the finished front and back. If I hadn’t seen those pictures I probably would have discarded my front piece just because it looked so weird!
I think I know how to pick up the stitches to start the collar except for one thing…should the RS of the back be facing me when I start picking up those stitches? (The alternative would be to have the RS of the front facing me, which would mean I would start working with the WS of the back piece facing.) The answer to this question–and any other advice–would be much appreciated.
Anonymous
Right side facing – great question! It makes it so the ridge that forms when picking up stitches is pushed to the inside and is not visible. Good luck!
Amy
Hi, it looks like in the picture Kendra is picking up stitches with the RS facing her. And I was looking on the web for videos about picking up stitches, and they show the RS facing.
hope that helps,
Amy
Darlene
Thanks for the help Amy. If I had taken the time to read the instructions I would have known that! I was so concerned about trying something new (picking up stitches) that I didn’t notice those details in the pattern’s directions. Duh!
Amy
this is my first sweater, too, so I’m learning as I go along…I’m enjoying the sweater so far:)Â
Wisteria Shawl Collar Pullover KAL: The Final Seams! | Lion Brand Notebook
[…] Wisteria Shawl Collar Pullover: Working the Collar […]
Enegalvan
wont it be easier to knit the pull over all in the “round”?
Anonymous
While it would eliminate some seaming, there are many other things to consider about knitting a sweater in the round or flat. See my earlier post where I address these considerations:
http://blog.lionbrand.com/2011/09/28/wisteria-shawl-collar-pullover-knit-along-gauge-swatch-and-casting-on/
nobodyssister
I have exactly 34 stitches along the back neck in order to start the collar. Unfortunately I’m making an XL, which calls for 46 stitches. How do I stuff them all into the 34 stitch back neck?
Anonymous
That is a predicament! I might just pick up a couple along each shoulder seam like I mentioned I did and the 34 along the back of the neck – that should get you close to 38 maybe? Then work one row where you increase evenly to get up to 46 before you start the collar instructions. This will make the stitches less bunched than I fear might happen if you try to pick up too many stitches in that area right away. Hope this helps!
knittingnancy
About joining at the shoulders: why can’t I do a 3-needle bindoff instead of a graft?Â
I kept my stitches on waste yarn until I know what I need to do here/
Anonymous
Binding off and then seaming the shoulders makes for a sturdy seam to provide more structure for a large sweater like this one, but ultimately the decision is always yours! If you would prefer to do a three-needle bind-off, that’s just fine. I just provide explanations about what I chose to do. Enjoy!
Ann N from Florida
I was having a problem finding the blog! I have my front and back blocking now have to do sleeves. Can’t wait to get it finished. I used a contrasting solid color for the ribbed portions.
Anonymous
Great idea! Enjoy 🙂
Forearm Workouts
Forearm Workouts…
[…]Wisteria Shawl Collar Pullover KAL: Working the Collar | Lion Brand Notebook[…]…
Jfs1121
I am learning to knit and wondering if I will ever learn. Â Knitting books have been scarce.
bisuteria para niñas
bisuteria para niñas…
[…]Wisteria Shawl Collar Pullover KAL: Working the Collar | Lion Brand Notebook[…]…