
![]()
Note: This is the third installment of our Spring 2013 Knit-Along. To view previous posts, click here.
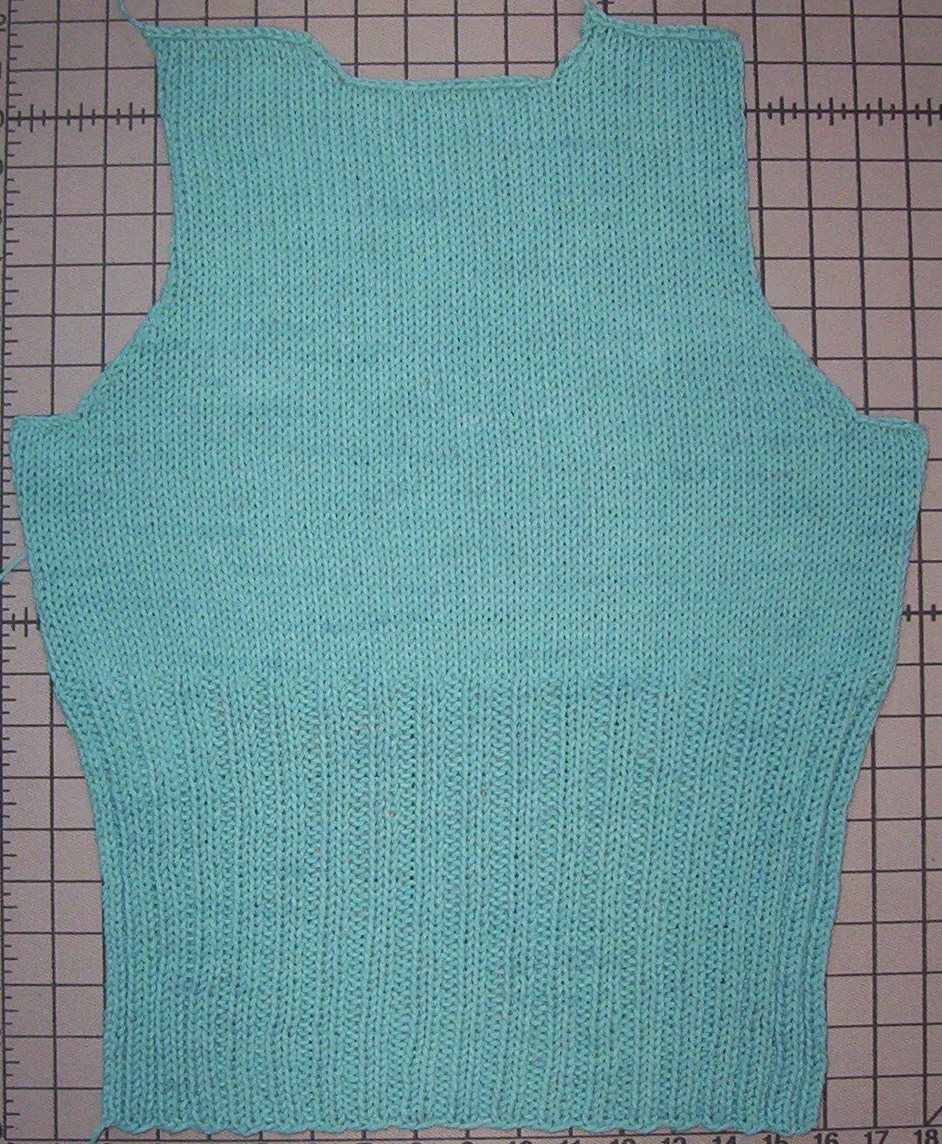
This week the weather where I live seems to be right on cue for our Spring Knit Along with sunny, warm days all this last week. Working with Cotton-Ease for this project has been perfect for these days where my windows are open and I can already be found knitting on my porch. This week I finished the back of the Tranquil Tank Top.
The back is the simpler half of this top with only ribbing and stockinette stitch (and a little shaping thrown in.) The lace will appear after we finish the bottom of the front. As I was knitting the back, I remembered a few things that will make sure this top will fit and look great. All of the sizes of this pattern call for the bottom ribbing to measure 9” before starting the stockinette stitch pattern for the upper part of the back.
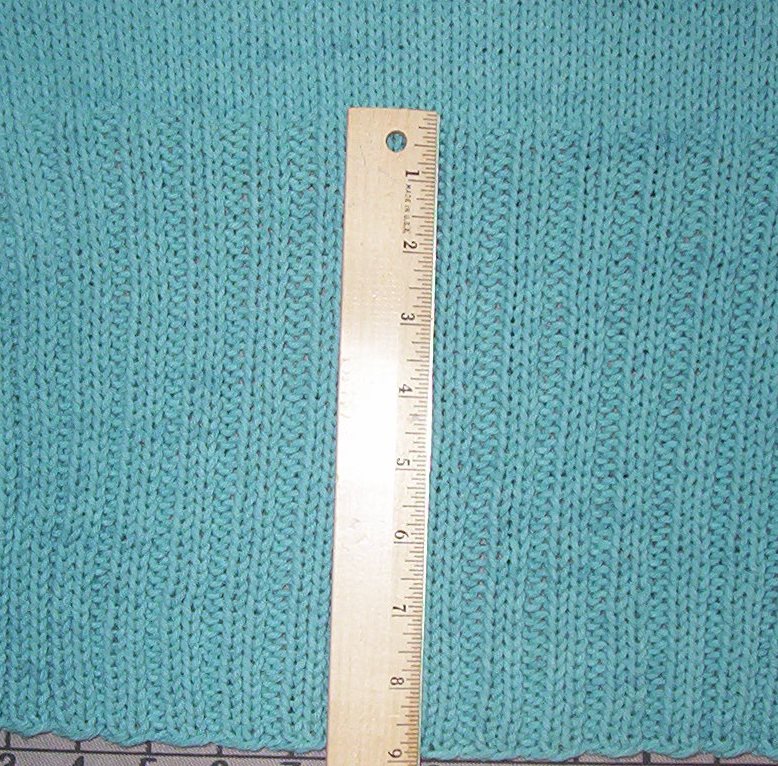
When I thought I had knit the full 9” of ribbing, I remembered that measuring ribbing can be a little tricky as ribbing should be measured slightly stretched before I measure. What I thought was 9” was actually not even 8 ½” when I measured it slightly stretched. Working a longer piece of ribbing can create this effect, so it is always good to just slightly stretch your ribbing before measuring the length. Take a look at this picture below – I have just stretched the ribbing a little and it measures 9”.
My last row of my ribbing was a wrong side (WS) row, which started with 2 purls and ended with 2 purls. I want to make sure that the ribbings to both my back and my front will have 2 knits on each side of the right side (RS). (You can see this is in the first picture above.) Making sure the ribbings of the front and back are worked the same will make it much easier to sew up the sides for a very nice finish. The stockinette stitch started with a knit row on the RS, where there are 2 knit stitches on each edge of the ribbing. I will keep this in mind when I start the lace part of the front.
After binding off for the armholes, there are some decreases that I can see will be very important for the lace patterns on the front. The back is a good place to try these decreases – especially if you have never done an “ssk” before.
The 2 decreases worked while knitting this top are a Knit 2 together (K2tog) and a Slip, slip, knit (ssk). Both of these are done to decrease a stitch, but the resulting slants of these two decreases are opposite. A K2tog will result in right-slant, whereas the “ssk” is a mirror image that results in a left-slant. These two decreases will be very important for the diagonal lace patterns in each of the two upper front pieces. Luckily for us – there are two great videos on the Lion Brand website that show exactly how each of these decreases is worked. So, if you have never worked a K2tog or an ssk decrease before – the back will allow you to try these out for the armhole and the neck shaping.
One common question that I am asked as a knitting teacher is about how to measure armhole length. Measuring along a straight armhole edge will give the correct length, but measuring the shaped edge of the armhole will give an incorrect measurement that will result in a shorter measurement than the armhole needs to be. The Tranquil Tank Top pattern has a shaped armhole which can cause this problem if not measured correctly. I find the best way to measure a shaped armhole is to place a detachable marker (or safety pin) in the middle of my work, on the first row of the armhole shaping. Then, I measure straight up from my marker to my needle to get the correct armhole measurement.
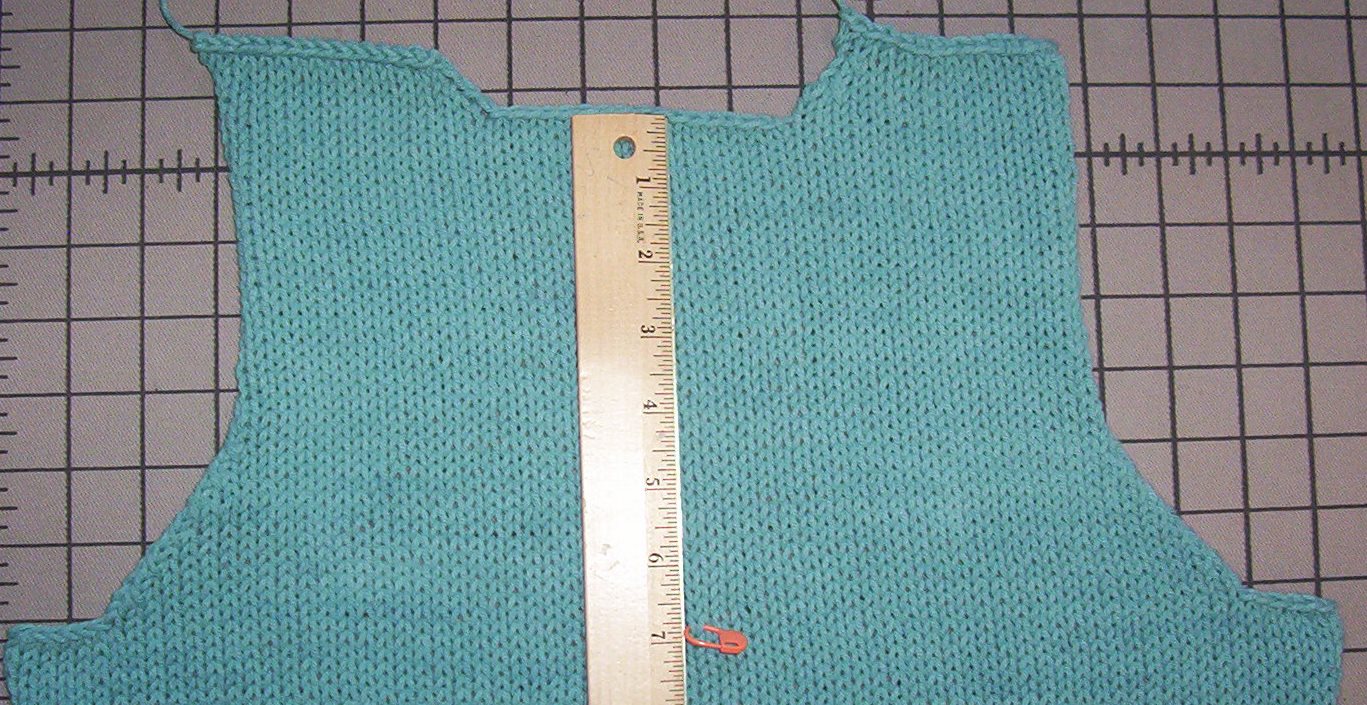
For the large size that I am working, my armhole length needs to be 7” before I shape the back neck. Once again, both decreases, the K2tog and the ssk are used to shape the back of the neck. Now that the back is done, I am working the ribbing for the front which worked the same as the back. I’m looking forward to starting the lace pattern! How is your project going so far?
Previous Posts from this Knit-Along:
You must be <a href="https://blog.lionbrand.com/wp-login.php?redirect_to=https%3A%2F%2Fblog.lionbrand.com%2Ftranquil-tank-top-knit-along-ribbing-and-knitting-the-back%2F">logged in</a> to post a comment.
Elaine Greywalker
Thanks for the measuring tips. I’m only a couple of rows into the back stockinette so I can add ribs if I need to. I’m glad to learn about the armhole measuring before getting to that part. A helpful post!
Sarah
I’m several rows into my stockinette, and all went well with the decreases I had to do to get back to 66 stitches from the 72 stitches I used for the ribbing. The only thing I’ll change on the front for this is that I’ll do all the decreases in the purl ribs — regardless of the exact count of proportional distribution of the six stitches I need to decrease. The decreases will be even less noticeable. All in all, the decreases are barely noticeable in the knit stitches.
Zontee
Glad to hear it, Sarah!
Linda
Everything so far went well, back complete, ribbing done for front and now ready to read chart which I rarely do, so I will have to be careful. I am Using VC yarn in silver heather, looking pretty.
If I like this may try another in cotton ( but thinking as I am knitting the top, wouldn’t mind having a little short sleeve sweater to go with it to make a set, but only thinking about it) late getting started today went garden shopping with my sis, but I am ready now. Thanks you so much for the knit along blog. Linda from Jacksonville, FL
Marijan
Those measurement tips are great! I am about an inch into my ribbing. Your tips about the ribbing were good too, so you have a nice flow when you sew up. I added a stitch on either end of my ribbing, so when I sew it up the extra stitches go into the seam.
Jeannie Otterness
I am just about to start the neck shaping on the back. So far, it’s going pretty quick! I love the ease of using Vanna’s Choice in Dusty Blue, although I would have preferred to use Cotton Ease, but just couldn’t find it where I live.
Erika R Friederichs
I am just getting to the stockinette. I’m glad I read your blog before measuring to start the stockinette. Thank you for all the great tips!
Grandma Linda
You must have a whole lot more time to knit than I do. I am not even done with the back ribbing. Hope you are leaving the posts up all summer 🙂
Zontee
Hi Linda, all of our blog posts stayed archived on this site. Just click on the “Knit-Along” category on the right-hand bar at any point to pull them all up.
Elizabeth Wade McCullough
I’m still on the back ribbing too.
Grandma L.
I have finished the back. I am wondering if there is any more finishing on the neck bind off. It looks rather unfinished.
Zontee
Hello, there isn’t more finishing on the neck bind-off, but you could certainly do a single crochet edging or other finishing once the entire garment is completed and seamed up (you may want to wait until it’s seamed up so that you could do the edging around the entire neck opening). Hope that helps!
Grandma L.
Thannk you for your very quick reply. I will probably do single crochet around the edge but I will wait till it is finishedand put together. I am enjoying this pattern and plan to make 3 for my daughters. They will be for Christmas if I can hold on to them that long. Thank you again.
Dixie Brown
You could also make a decorative neck edging with novelty yarn, beads, twisted braiding, etc.
Veronica K. Albin
I just finished spinning the wool from a llama we used to have. The color is called wood rose but to me it is sort of a heatherish gray and brown. I think it will be very pretty. Waiting for the wool to dry so I can start. Ronnie MI
nannakah
Oh my, I am way behind! But I do have time to get started today and maybe catch up this weekend. Your pictures and instructions are great (Zontee) thank you for that.
Dorothy Bush
I have made my armhole decreases and am knitting my way to the neck section. Enjoying the pattern, the knitting and the comaraderie. This was a great post – very helpful photos. Thank you.
KAinPA
Just made my swatch last night and got the right gauge the first time, yippee! While I don’t anticipate any problems with the back, I really appreciate all the helpful information and reminders before I get started. It’s the front that has me a little nervous. I’ve never knitted from a chart, but I’m sure I can get the hang of it. It’s the cables that scare me the most, but I want to stretch my comfort zone, and this is a great opportunity to do that together. 🙂
Zontee
Hi KA, you might want to check out this blog post Heather wrote about cables:
http://blog.lionbrand.com/2013/01/18/doing-the-twist-basics-of-cable-knitting/
Hope it helps!
Donna Jean Capps
This might be a dumb point to make but I am kinda new to knitting things that are not rectangles…. I got to my 9 inches and read what you wrote about “slightly stretched”. I was so confused because I was thinking stretching would make it longer not shorter…. but now I get that you meant slightly stretched horizontally. I just checked and my 9 inches also became only 8.5 inches. Glad I caught on before going to the next step.
Peggy Schenk
So far so good. I’m looking forward to working the front with the chart. I’ve been knitting for more than 50 years, and I’ve never done chart work. It’s about time.
Sheila Rasmussen
Great information to have while working this pattern. Thank you for providing the videos too. I’m almost through my back ribbing & will start the stockinette portion soon.
Ursula
Hello, I am confused on the front chart. When the chart shows less blocks, do I bind one off?
Zontee
Hi Ursula, that’s correct!
Ingrid
For the first row of armholes, yes, you have to bind off stitches. For the other rows, the decrease is in the row with k2tog or ssk.
ursula
So for the left front, the only place that I bind off stiches would be row 25. The rest of the decreased are done within the pattern .
Ingrid
Yes, that’s it.
ursula
Thanks so much for your help
poeknitter
Thank you for your measuring tips. I was working on the back ribbing while camping and wondered if I should stretch it to measure it or not. Didn’t get much knitting done since my grandson came camping with us (smile) so the measuring questions were forgotten until now when I just read your blog. I am using Vanna’s purple print and it is beautiful.
DollyVarden
Hello Dolly Varden Here…
I am making the s/m size, in regaurd to the armhole length..after decreasing to shape armholes…Do I “Work even in St st until armhole measures 6 inches(7,7) ” as written in pattern or knit to 7 inches as shown in schmematic.I have placed a marker on the first decrease row as shown above.
Thank you for your help..
Olga
Zontee,
How do I cast on 30 stitches for the left front? I used the backward loop method and it is very loose. Also, when I cast on am I doing so on the RS or the WS or does it even matter. Thanks for any help.
Knitting the Tranquil Tank Top KAL Part Four: Lace and Cables | Lion Brand Notebook
[…] the few “k2togs†only at the armhole shaping. (If that sentence sounds funny, you may like to read the last blog post that explains the difference between these two […]
Martha
I was doing great with the chart until I hit the armhole decrease row. I keep ending up with an incorrect number of stitches. I’ve pulled several rows out more than once and am just at a stand still. Obviously I’m doing something wrong but can’t figure out what. The first row of armhole has you bind off 4 stitches, then some rows further up look like there’s a bind off at the other end. Regardless, I’m alwasy one or two stitches off, which of course throws off the lace pattern. Any words of wisdom will be appreciated.
Jenna
I used a different yarn than the pattern called for. I have a little gap in between all my ribbing. It won’t cause to much trouble in the end if both sides look that way. When I used a smaller needle that didn’t happen but I think I measured right when I did the gauge and needed the larger needle. Any advise I would hate to rib out what I have done. Also since I have a gap should I stretch my ribbing a little when measuring?