
Note: This is the fourth installment of our Spring 2013 Knit-Along. To view previous posts, click here.
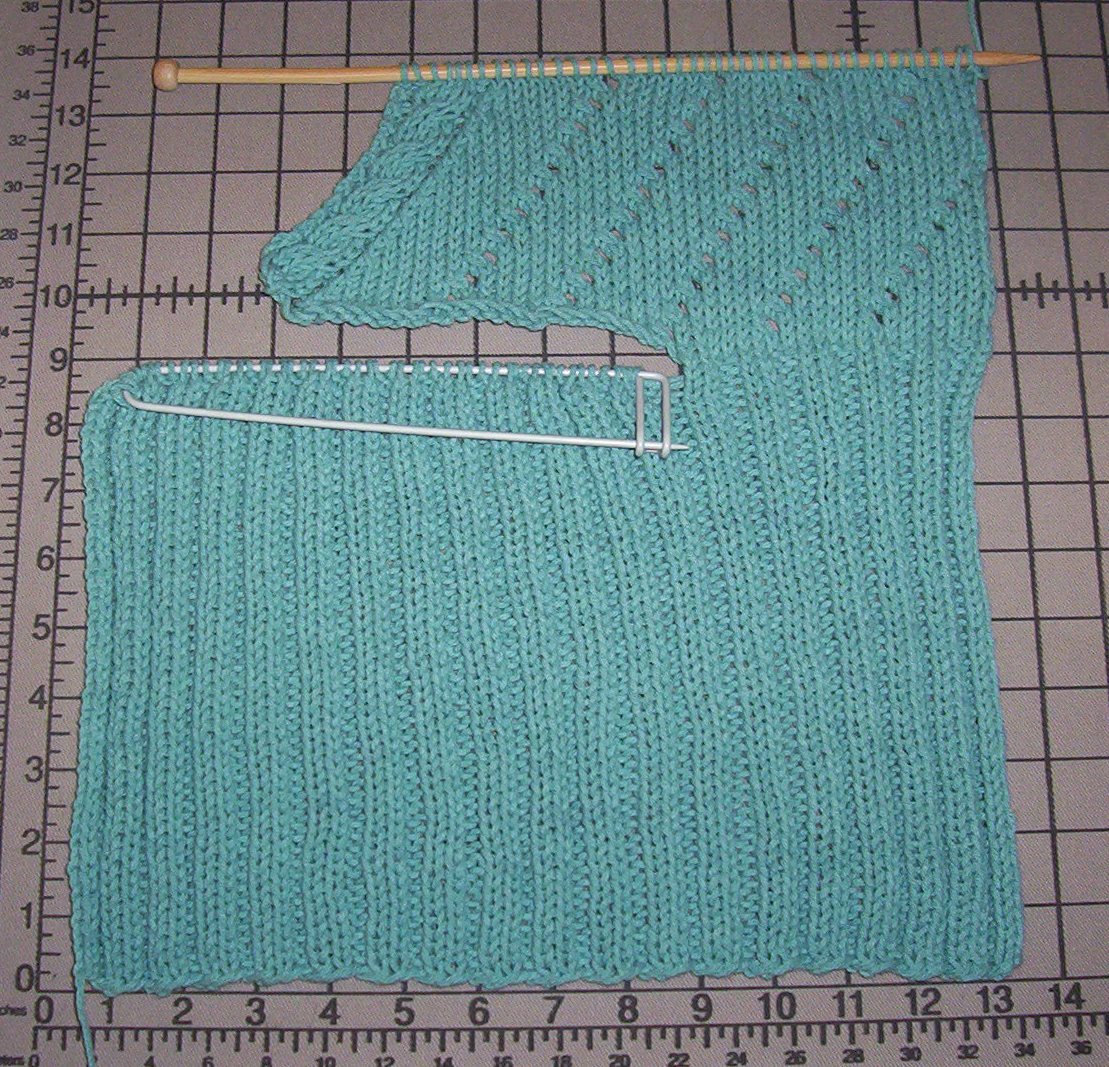
![]() This week, I have been working on the front of the Tranquil Tank Top and after nine inches of ribbing at the bottom, I’m ready to tackle the lace and cable part of the top! Before I started the lace, I made sure my ribbing for the front was not only the same length as the back, but that the right side (RS) of my ribbing was the same as the RS of my back ribbing. I had two knit stitches on each side edge of the back ribbing, and I made sure I did the same for the front. Double checking this will allow me to sew side seams that will look seamless when finishing.
This week, I have been working on the front of the Tranquil Tank Top and after nine inches of ribbing at the bottom, I’m ready to tackle the lace and cable part of the top! Before I started the lace, I made sure my ribbing for the front was not only the same length as the back, but that the right side (RS) of my ribbing was the same as the RS of my back ribbing. I had two knit stitches on each side edge of the back ribbing, and I made sure I did the same for the front. Double checking this will allow me to sew side seams that will look seamless when finishing.
The left and right upper sides of the front are written in chart form instead of written instructions in this pattern. When I first glanced at the instructions, I was surprised to see six pages of charts! Then, when I looked a little closer, I saw that there are actually two charts for each of the three sizes. This will make for easier chart reading, rather than having all the sizes included on just one or two charts. I happened to print out all the pages of this pattern before I saw this, so I took out the four pages of charts that I will not need to make my size. That way there will be less chance of confusion as I start the charts. We need to start with the left front, so here is the left front chart of for the Large size: (Note that you can view charts for all sizes by clicking on the pattern link.)
It’s a good habit to look over your chart before you start to see how the pattern progresses. The left front of the Tranquil Tank Top is the half which will be partially hidden behind the right front that overlaps in the middle. Since there is this overlap of fabric between the left and the right fronts, the left front needs to have stitches cast on near the center front edge. These will be sewn down behind the right front when I am finishing. One question I often hear as a knitting teacher concerns how to cast on stitches at the end of a row. Since a picture is sometimes worth a thousand words…here is a link to a tutorial from Lion Brand’s Learning Center that shows us how to work the “backwards loop” cast-on method:
After casting on those extra stitches for the left front and purling back on the wrong side, the chart for the left front begins with row 1 (which is on a right side). I noticed that each right side (or odd numbered) row has a decrease just before the cable section of the front. I also noticed that all of the lace pattern for the left front includes only “ssks” with the few “k2togs” only at the armhole shaping. (If that sentence sounds funny, you may like to read the last blog post that explains the difference between these two decreases.)
One of the nicest parts of this top is in the shaping of the front that is almost “hidden” with a single ssk just before the cable section. Working up the left front, I found myself making the same mistake more than a couple of times! Where? Well, the lace pattern in the left front is a repeat of a yarn-over (yo) before each ssk. My hands became so used to working a yo before each ssk, that I found myself working a yarn-over right before that last ssk – that is for the shaping. Making that mistake will keep the front from shaping at the neck. I have made sure to double check the end of each right side row that I have not made that mistake again!
Now I’m ready to work the armhole shaping and then the rest of the left front. This has been a very fun project so far, and I hope you are all having fun knitting this one, too!
Previous Posts from this Knit-Along:
You must be <a href="https://blog.lionbrand.com/wp-login.php?redirect_to=https%3A%2F%2Fblog.lionbrand.com%2Ftranquil-tank-top-knit-along-knitting-the-front-is-off-the-charts%2F">logged in</a> to post a comment.
Donna Jean Capps
I’m having a hard time with the extra cast on stitches getting stretched out too much. I already took it all out once and re did it tighter but it is happening again. :O(
Dorothy Bush
What a lovely pattern. I’m enjoying working it.
Sarah
I have to agree with Donna, I’m having the same problem with the cast on. When I purl the next row, it really stretches out. What cast on did Heather use? Dorothy–what cast on did you use? I need more guidance here. Thank you.
Sheri
Umm. I kinda jumped ahead of the class and finished mine in a week. I knitted the ribbing in the round, and then knitted all 3 bodice pieces flat to the under arm. Anyways, it turned out really cute! Great pattern. I couldn’t put it down, once I got started.
Elvira
That’s a great idea! Do the ribbing on the round. I have a similar top that had the ribbing done on the round. Must look neat.
Olga
This is my first time knitting with a chart and I’m finding it to be doable but challenging. I read on a post from last week that I should only bind off on row 25 of the front and the rest of the pattern decreases by following the chart. My question is kinda silly but how many do I bind off? 4?
Gina S.
Olga, it looks (on the chart) like row 25 starts 6 stitches in as compared to row 24, so I’m guessing you’d bind of 6 stitches.
This is my first time working from a large chart as well, so I hope that’s accurate advice! Good luck. I’m still working on the back myself!
Olga
Thanks Gina!!
Donna Jean Capps
I’m in the same spot and have the same kinda the same question. I didn’t see that post you are talking about though. I was wondering if I should bind off on row 24 or 25. This is my first time working from a chart also.
Donna Jean Capps
Okay, someone answered my question on the board and now I’ve worked that row. You bind off 6 stitches at the beginning of row 25 and then you will already have one knit stitch on the needle so don’t forget to count that one as your first stitch.
Olga
Thanks Donna !!
Olga
Donna,
I’ve finished the left front and am now at the right front row 25. How do I bind off at the end and not have my working yarn so far away from a live stitch. Do I just turn the work around? Jean suggested I look up your posts but couldn’t find one that spoke about this. Thanks!!
Olga
I mean Jane.
Elvira
I haven’t started the front yet but will keep that yo in mind! And, thanks Zontee for your article on purposely changing the gauge. I did just that since I need a smaller size. You can give a knitter a pattern and she’ll have a sweater to wear. Teach a knitter to purposely change the gauge and she’ll make any sweater for a lifetime. 🙂
Donna Moody
I actually completed this tank and it was amazingly easy, instructions were very well written and I love how it turned out. I made the small size but I think now I will make a large size in a different yarn and see how that turns out.
Mary Ely
I have finished mine and I love it. I found it really easy, very well written instructions.
Thank you.
Serpino
Somewhere in the pattern does it tell you what all the dots and y,s mean in the chart?
Elaine Greywalker
Yes. There’s a key at the top of the first chart just below the “Finishing” section.
Cheryl Pitt
I’m having a problem. I’m knitting a large and I just did the first row of the left front chart and I have 4 extra stitches at the end. As I look back over the pattern, I see that I should have 56 stitches after purling after binding on 30 more stitches. I have 56 stitches. The first row of the L chart says there are 52 stitches. Should I have only bound on 26 stitches???
Sandy Stadelmann
I see the chart starts the armhole decrease at row 25. (size small) I am not getting 20 rows =4″. it’s about 31 rows=4″. So how should I increase the pattern to match my count? Should I extend down from row 1 and add 6 rows in pattern before I get to row 1?
Olga
Hi all,
Knitting is going great. I can’t wait to finish and wear it!! Question: I am knitting the right front and on row 25 I am suppose to bind off some stitches, how do I do this on the end of Row 25? I know how to bind off but when I BO on this row I ended up with my working yarn too far away from my work. I hope that I’ve explained this the right way. Basically I do not know how to BO on the left side of a RS row. Thanks for any help!!
Jane
Look up a few posts at Donna Jean (she tells you how to do it perfectly.
zoibe@aol.com
I am glad, I just completed the top. I used the cotton ease I will send this one to my mom. The instructions were easy to follow.
Thank you so much
Karen
I’ve finished the ribbing, divided my stitches for the front, and casted on the additional 30 stitches for the size small. I am ready to start knitting from the chart! Reading from right to left I knit 4, yo, and ssk, as per the pattern, continuing across the row, but as I reach the end of the row, I am short stitches. Doesn’t each ssk use up 2 stitches? Not to mention the cable, ugh! Can you give any additional instruction on reading the chart and knitting cables? Wasn’t there mention about alternatives for the cable needle, or will I need to get one, and if so, are they sized the same as regular knitting needles?
Elaine Greywalker
The ssk decreases by 1 stitch, which is why you YO. or you could say the ssk compensates for the YO which increases by one. I’m using a cable needle that’s about a size 10. I’ve never worried about the size of the cable needle since it basically just holds the stitches that are already sized by the needles used for the piece. You could probably use a stitch holder for these cables since they are so small — only 2 stitches.
Installment 5 in the Lion Brand Spring 2013 Tranquil Tank KAL! | Lion Brand Notebook
[…] Knitting the Front is Off The Charts […]
Elaine Greywalker
The first row of SSKs made me crazy! Hoping the other rows will be better due to more give in the knitting. I lost my first YO and compensated by doing an afterthought hole on the purl row. Also, kinda tricky to keep two stitches on the end of the needle while doing the cable. Annoying. Hoping to get better at this or else put one of those rubbery ends on while I do the cable. Having all those needles to work with is difficult.
Karen
I’ve watched videos instructing, chart reading and cable knitting. Following the pattern written on the chart, with 48 stitches, for the size small, on my needle, I don’t have enough stitches to complete the row. After the last ssk, on line one, I only have 2 stitches remaining, but a p, cable, p, k, remaining on line 1.