
Welcome back to the Mesh Raglan Pullover CAL! Hope you all had a good week of swatching adventures and have your hooks ready to go – it’s time to get this pullover going! This sweater is worked in the round and as such the traditional start is a long chain which is then joined with a slip stitch in the first chain to create a giant ring. Sounds simple enough, but the tricky thing is to make sure there isn’t a twist in the chain. If the chain is twisted it will always be that way and the top of your sweater won’t work up quite right.
Lucky for us, this pattern gives you another option for starting to eliminate this problem. In this alternative method, you work the first row of the pattern and then join for working in the round. This makes it much simpler because once you have the width of a row established it’s so much easier to see that it’s twist free.
An easier way to do something? Sign me up! To work the beginning this way, follow the instructions: “YOKE: Notes: 1.” listed above the traditional chain instructions. You’ll notice when you follow this method you will end with an extra chain after you work across – this is intentional! As the pattern states, you will later sew the ends of the first row together while weaving in your tails and this remaining ch-1 will become another space in the mesh pattern. Voila!
At the end of this set up, just be sure you still remember to place your markers in each of the V-st spaces (4 total) and then proceed to Rnd 2. If you haven’t used markers before they are simply another way to make things easier for you! By putting a stitch marker in each V-st space, you’ll remember that is where you need to do work the following V-st to make the raglan increasing a success.
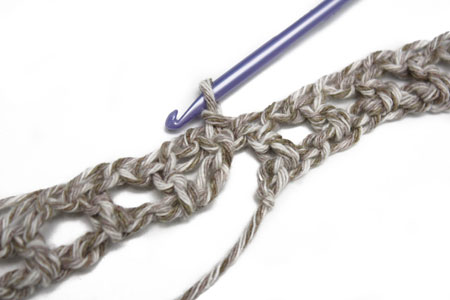
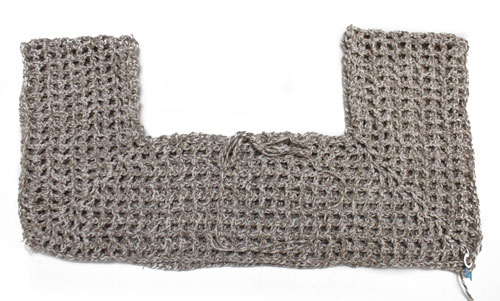
Speaking of increases, I just want to clarify how the increases at the four “corners” work. In all of the other stitches around you are skipping over the ch-1 spaces and working double crochet stitches in each dc across. For the increases, however, you work the dc in the dc as per the usual, ch-1, but then instead of skipping over the ch-1 space, that marked space is where you will work your V-st: dc, ch 1, dc. This will be followed by another ch 1, and yet another dc in the dc following the space. This is how the “corners” will look…
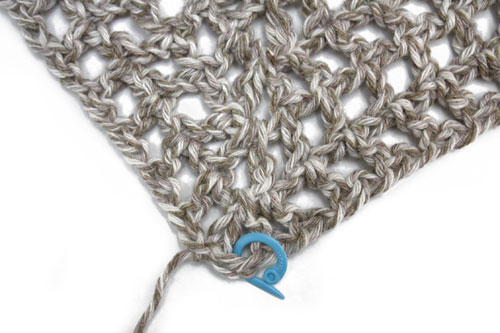
…and this is the result after the yoke increases are completed:
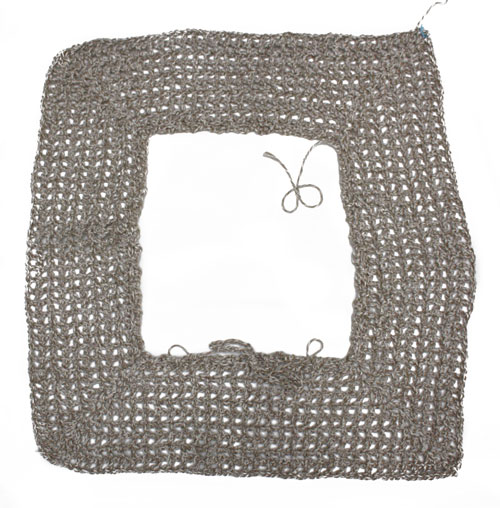
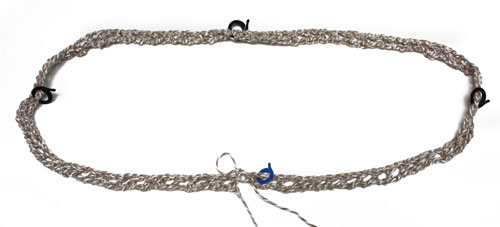
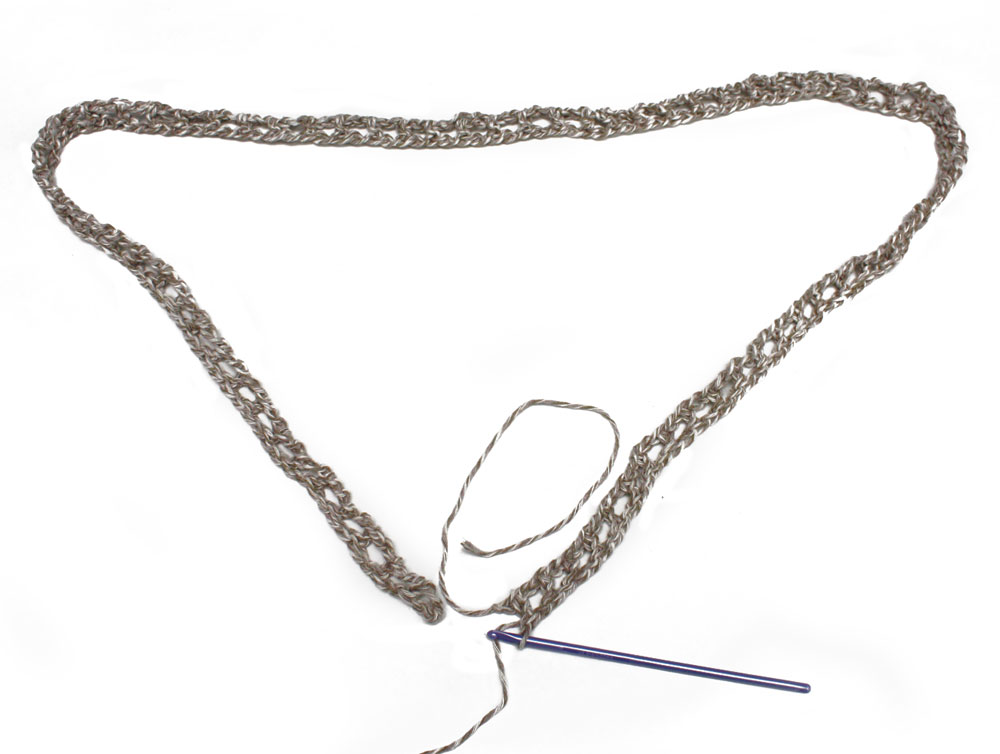
As you may have noticed from the photo above I already have the neck-tie in place. This is so I can try it on and know how it is going to fit when finished. As some of you may notice, the neck opening for this top is quite wide. This is because the finished garment has a neck-tie to cinch it to a closer fit, and I want to account for this while I try it on as I go. To do so, jump ahead to the “FINISHING” section, “Neck Tie,” but really it’s just a nice long chain that you then weave through the top of the mesh pattern. Ready to go!
I’m still deciding between two sizes, so I decided to slip the yoke on and see how it’s going for me. Uh oh…my row gauge is causing me some troubles! I didn’t think about the fact that the increases are worked on every round of this pattern, and as such if your row gauge is off, you will reach the correct stitch count, but it may not be long enough to reach to the underarm. Bummer. So now what?
I see two options:
The H hook I chose not to use did achieve the correct row gauge, so using the larger hook for the yoke then switching to the G hook for the remainder of the top seems like the right choice in my case. I was debating between 2 sizes anyway, so this will give me a little more room in the bust without added width in the body. Plus if the yoke ends up a little big, the tie is there to tighten up the fit! I’m going to rip back to row 2 and redo the yoke, which is a bummer but that’s why we’re here to support each other by working through this together! It’s only 9 rows and it’s better to get it right. I was once told, “faster isn’t better, it’s just faster,” and I think that’s the perfect way to look at this.
Alright, I’m going to go rip mine back and go again, so get your yoke started and hopefully learn from my attempt. If you have other ideas for how to account for this problem, please comment below! That’s why we have a crochet-along: to learn from each other. Next week we’ll talk about creating the armhole openings and continuing to try on the start of your sweater to be sure you’re getting the fit you want!
Related links:
You must be <a href="https://blog.lionbrand.com/wp-login.php?redirect_to=https%3A%2F%2Fblog.lionbrand.com%2Fmesh-raglan-pullover-crochet-along-starting-chain-and-raglan-increases%2F">logged in</a> to post a comment.
DEE
I got the stitch gauge w/ a G Hook, but not the row gauge. I got the same results as you when doing the gauge swatch, H seemed too loose. Not sure what hook to go with…are you going to go w/ both hooks? I think I will use the H for the yoke, and the G for the rest of the body…seems easier than making additional increases…
Debra
Dee,
Re-read the last two paragraphs of the blog post above. It looks like Kendra is choosing to go with two different hook sizes to get the size she wants. She gives a couple of options for handling this problem. 🙂
DEE
Thx for the response, but I wanted to know if after ripping it out the two hooks worked…
Anonymous
Worked out well so far! I kept the first row of the pattern in the G hook to keep the yoke for getting really loose, then worked the remaining 9 rows with the H hook. Much better and doesn’t look too big overall. Hope it works well for you as well!
Jean Michael
glad mine fits so far as I am almost 2/3 the way through the body
Barbara Bee
Wow, that looks terrifc! :-)  Barbara
Evelyn
Jean’s is looking great! I’m just past the
yoke and started on the body and I have a question before I go any further.
Â
At the
end of the first Body rnd, ” join with a sl st in 3rd ch of beg ch.”
Okay so far. But  in the next  rnd, it says “sl st into next
ch-1 sp, ch 4, turn, *dc in next dc, ch 1; rep from * around; join with sl st
in 3rd ch of turning ch.” It looks like doing this at the end of each Body
rnd will result in an increase of 1 dc in each round (3 chs of the ch 4 would
count as a dc and while all the other dc’s are made into dc’s in the previous
rnd, this one is in the middle of a ch 1 sp.) That’s eventually 23 additional
dc’s and I don’t see how that can be right. I assume you should have the same
number as you started with.Â
I’ve done 2 rnds of the Body section and the second rnd has one more dc than
the first – unless I’ve done something wrong here.
Can
anyone help?
Anonymous
I’ll try to clarify this in a photo in the post this coming Thursday to show how the join at the end of each round should look because I think a written explanation will get more confusing.
Bethany
I have to say I’ve had some trouble with the yoke. Â I didn’t do the alternative, because I really don’t like sewing things together, and I had to try twice to attach without twisting. Â The other thing that has given me fits is the joining corner of each round. Â After lots of studying the other “corners” I think I have found my missing stitch, so I just want to say to everyone: don’t give up! Â You can do it!
Berta Gilholm
I did half of the yoke and basically had one extra dc, so frog and start again. This time I took my time and realized that the (slst, ch 4 at end and beginning of rows ends up being another v stitch in a corner) that helped me get my brain straight. I love the cotton ease and the pattern and will probably make two.
Anonymous
I’ve run into the same situation with the g hook versus the h hook as several others. I worked up through round 4 with the h and found the neckline to be far too big, so I dropped back to the G, knowing the rows would be too few to make gauge, but I proceeded on. Now, it fits nicely for the neckline but needs rows. I will be ripping it out, yet again. However, I think I still want to use the G versus the H. I’m curious how it would look if I do a increase round, then work one even, then increase round, and so on… I think I will try it and see what I get! Why not, I can always rip it out and start again…
Anonymous
That’s another great idea – you may find that is a little too slow of an increase, so maybe try 2 or 3 increase rows, then one round without the increases, then 2 or 3 more increases just so you don’t end up with a yoke that is too big. Good luck!
White5415
Hi Kendra, In row 1 Isee the 3 v-st. I don’t see where you do the 4th. v-st. I am making the med. size.
                                            Thanks Ruby
Debbie
The 4th V-st is created when you make the last dc ch1 and sl st to the 3rd chain in the ch 4 that started the row.
Pat
A couple of things: as I read the pattern, the two long sides were front and back, and the two short sides were the sleeves. Your photo shows the front tie on a short side. Is this confusion you, me or the pattern?
Second thing: I’m six rows into the yoke, and it’s looking good, but I can already see it’s going to be tight across the bust. My thought was – can I add an extra v-stitch at each side of the front for several rows to give myself some ease? In gauge, 4 stitches will give me not quite an inch, and two extra v’s would give me 4 stitches per row.
I’m going to experiment with it, but I wanted to see if anyone has reason to say “NO!! Don’t do that!!!”
Thanks
Anonymous
Hi Pat, I wasn’t confused as to what was front, back and sleeve, and find the pattern relatively easy to read. The one thing about it that I find lacking is in measurements. The little sketch didn’t do much for me. For instance, what should the measurement be from the neckline to the finished bottom of the yoke. Now, I know I can do the math by figuring the exact measurement of one row in gauge, but a easier reference to it would be nice.
As for adding additional V sts, it will indeed give you a bit more ease, but it will also skew the raglan sleeve line, likely taking away the tidy diagonal line that is produced by the V sts in pattern. You would probably be better off to jump up a hook size as that will give you more room in the width of the stitch, as well as a bit more length of stitch.
Let me know how it all works out for you! Stitch on!
Bethany
Hi Pat! I see what you mean… the way I’m reading the pattern, I agree that it looks like the tie should be placed on a long side, (14 etc for sleeve, 18 etc for front) although it will be easy to move later ;).
Anonymous
Oh my goodness, Pat! I apologize and take it back! I didn’t quite get what you were saying that you were confused by… I didn’t even notice how Kendra’s tie was postioned. I, too, read the pattern to state that the long sides were front and back and the short were the sleeve. I’ve continued into the body, as such.
I’ve reviewed the pattern and posted the section. Note that the first round clearly states that the sections with less stitches are the sleeves. The round begins with the sleeve, goes to the front, on to a sleeve and ends with the back. I believe we understood the pattern correctly….
CatalpaKay
I’m not quite sure the pattern is clear about the which end (long or short) should be the front. Remember each corner is part of the sleeve, so when it refers to a sleeve without specifying front or back (which it does twice), it could mean either one, it’s not helpful in that way. Sometimes the pattern refers to the increase as part of the ‘first’ sleeve. It doesn’t say right/left front/back. When it does say front and back, it doesn’t say if it’s the right or left, so it’s hard to get your bearing as to which corner you are actually at.  I too was originally thinking(assuming) the long edge belonged in front, but now I’m not so sure. I haven’t started the body yet, but am done with the yoke. When I try it on, the short end definitely looks/fits better. Hmmm?
Anonymous
My bad! Sorry about that in the photo – I hadn’t noticed the few extra mesh stitches across the front and back versus the sleeves. Thanks for catching it for me and sorry for the confusion – you are absolutely correct. I will correct the tie!
As far as the increases, I would do more rows of the raglan increases or use a larger hook for the yoke to give you a little extra room.
Ellen
 I am making the large size and would like to know how many double crochet should I have? I think I am 3 short and will rip out again..
Ellen
Anonymous
Hi Ellen,
At the end of row 11 you should have 156 dc.
Janice Eagan
Whoa, I’m glad I read this first. I, of course, didn’t save my H 5mm swatch to measure the row after reading how stitch was more important. Last night I whipped up 2 swatches, one in the 5mm and just out of curiosity the J 6mm. Turns out I’ve got the right gauge for stitch AND row with my trusty Susan Bates 6mm. Sweet! Looks like I can start this segment today.
Anonymous
Glad it worked out for you in the end! As an aside, I always keep my swatches, only taking them out if I need the yarn at the end of the project – that way you can keep referencing them if need be. Next time, right?
Yarn
Your article is amazing I got an effective knowledge from you article. I want to read more about your other articles on Yarn and Cotton yarn
Vonciele
I have completed 7-8 rows of yoke and after reading this post decided to check gage again and corners are right on, but sides slightly short, so I think I will carry on and finish the yoke to judge the piece. I also have been trying to decide between two sizes, may go with larger size now since I never washed my swatch, oops. I Have been thinking of using a ribbon in the yoke instead of crocheted chain tie so will slip one in for sizing for now.
Â
I have not read all posts so forgive me if I am repeating info here but, I wanted to let those with less experience crocheting know that I have discovered from past experience that when I use 3 chs for a starting double crochet, that my starting edge/corner is usually too long and so I almost always use 2 chs for my starting double crochet. In this pattern, I ch 3 to start row, 2 for double 1 for ch. Be careful not to let chains get to tight. (I tend to crochet a tight stitch )
Janice Eagan
I just thread 3/8″ ribbon through this morning. I like the ribbon look myself. I went with white to contrast my blue yarn. I’m thinking having a few different colored ribbons to change out and match to different bottoms.Â
Anonymous
Continuing from my last post, I decided not to rip out the 7 rounds that I completed, because the way that my row gauge was going (8 rows to 4 in), I figured that in order to meet gauge I would just need 2 additional rounds on top of the 10 needed for the medium yoke. So, I proceeded to implement what I had suggested earlier, working one round even, then the increase round, another round even, and then the final increase round (total of 13 rounds). In this manner, I was able to maintain the integrity of the stitch guage and end with the correct number of stitches.Â
I my opinion, it worked out well, and unless someone was looking for it, the “worked even” rounds do not alter the look whatsoever.
Anonymous
Glad to hear that worked well for you!
Anonymous
Thanks! I was thinking after reading your earlier response that adding the work even round between all or some of the yoke rounds might be a solution for modifying the pattern for someone that may not need more room in the body but does in the bust….
Subject: [lionbrandnotebook] Re: Mesh Raglan Pullover Crochet-Along: Starting Chain & Raglan Increases
Bethany
I worked a row with no increase, and now in my next row the join is no longer at a corner, but a couple stitches over. Â Just wanted to know if you had that problem at all, and if you did, how you dealt with it.
Thanks!
Anonymous
I didn’t really notice it as a problem. When working without the increase, I just worked all of the prior stitches in pattern beginning from the corner; then on the next round I just tried to stay cognizant of where the corner v-stitches were and made sure to line up the v-stich increase on the center.
Katymae01
After a couple of starts, I was able to get the yoke finished in one sitting. It looks wonderful. Had to use the larger “H” hook but may go down to the smaller “G” hook for body. Not sure yet. Just excited the yoke turned out so nice looking!
Anonymous
So, my yoke is completed, and onward I go….
Anikaz
That is really pretty. Â Nice work!
Anonymous
Thank you!
Debra
Ok, I finished the yoke and counted my dc. I should have 168 … no matter how many times I count, I come up with 167. I’ve looked and looked for the “missing” dc stitch and can’t find it. Since we will be putting chains in the underarm area do I have to rip back and try to find the lost dc?
The yoke looks really even. I can’t see anything that looks like an error.
Anonymous
Debra, I it really shouldn’t affect the overall look. It’s you’re call but I personally wouldn’t rip it out at this point. I, realized that I was six stitches short after I completed the underarm and first body round. I decided that the fit might actually be better. So in any case, I continued on rather than ripping back. Here is the current state of the garment…
Debra
Thank you. Your top is looking good.
I wasn’t sure. I was thinking that if I can’t actually see the missing 1 dc that it shouldn’t effect the overall garment. I appreciate your input. 🙂
retired teacher
I have finished the yoke. I crocheted 3 flower appliques (rose pattern) to add to the front of the yoke. I like the way that turned out. I’m not tech savy so I can’t post a picture.
Debra
Sounds like a nice touch.
Susan
Following the crochet-a-long with baited breath. Haven’t crocheted a garment in 20 years, just afghans, etc, because I CANT MAKE EM FIT. Can adjust ANY knitting pattern to make it work, and this saddens me because my mom was an expert at crochet, all kinds. This really looked like a garment I could do, but I have officially thrown in the towel, can’t rip out any more and stlll use the yarn…..BUT I will try it again after youall finish yours and I read your solutions to probs! OK, ladies, keep on posting probs and solutions, maybe I can learn something!
Wendy
Yikes! After reading all this from experienced crocheters I am a little intimidated. I have only crochedt afghans, scarves, dishcloths, etc. never a garment. Just starting the first round of the yoke because I had to order my yarn (marine). Will keep plugging away and hope that ignorance is bliss!
Janice Eagan
keep at it Wendy. This is my first garment and I’m surprising myself and already planning my next sweater.
Debra
I’m pretty new at crochet … this is my first garment and its going well. I find I am enjoying this much more than making squares and rectangles, lol. You can do it. 🙂
Mmelvincox
Wendy,
This is my first garment also and with some errors, stitches ripped out and basically understanding what to do – I completed one top and working on another. It just takes time and patience and don’t give up on it. The blog helps you to understand more. If I had waited I could have save myself some time and eliminated some confusion.Â
Maggie in St. Paul
After about 5 tries I finally got the yoke part done! Hooray! Here are pics of my progress so far….
Janice Eagan
I was so excited to get this yoke rocking that I sat and worked it like it was my job. On my first attempt, row 2 was short a few dc’s so I went back to look at the pictures that Kendra posted and realized that I wasn’t putting dc’s in the V-stitch posts (not sure of the correct terminology here). I was just v-stitching in the v stitch space so I was not increasing. I ripped and redid and attempt # 2 had the 148 dc the pattern called for. Yhay!
I’m making the Med size and I needed to dip into a second skein just before finishing row 10. This made me wish I had written down my gauge swatch measurements for unwashed and washed gauge on my printed pattern. Lesson learned. Weaving in my ends is not my favorite part of crocheting so I hope washing doesn’t unravel too badly.
When adding the neckline I wasn’t sure if I was supposed to count the v-stitch spaces as ch1-spaces. It didn’t seem right to skip them and as far as I can tell it looks like the picture. Also, I chose to thread 3/8″ ribbon through the neck instead of the long chain. This way I can figure out exactly how long I want the chain after the garment is completed or I might stick with ribbon and change out with different colors to match different outfits. I will seriously be needing a camisole under this top.I don’t know about anyone else but when I tried on the yoke before putting the ribbon through the neck line I was horrified at how big the yoke was and hoping it was going to shrink a lot when washed. Now that the ribbon is in I’ve got my fingers crossed this top doesn’t shrink too much. I’m thinking maybe I should have made the large and I am second guessing my gauge. Knowing what I know now I will be sure to take before and after swatch measurements for my next garment. I’ll be putting this away until the next blog installment.
Can’t wait till Thursday!
Ellen
I am trying to understand what your first paragraph said…dc in the v-stitch
Dee Ann
I have been crocheting for a long time now, but have never made a top. Scarves, hats, and afghans are all I have constructed before. I’ve never paid attention to stitch guage, but after reading all the posts I made 2 swatches. The H hook swatch was right on the stitch guage, but too long on the row count ( 2 rows too long) and the G hook swatch was several stitches over on the stictch guage but the same size on the H hook on the rows. Is this weird? From reading all of your posts, do you think it will be good for me to use the H hook for the yoke and then change to the G hook for the body? I recall reading somewhere about blocking. Is it easier to make a sweater that is too losse somaller with blocking or is it the other way around (make it bigger if it is crocheted too tight?) I think I crochet loosely. I’m all new to making garments, but really want to be successfuly at it. thanks for all the posts, it is really helpful to those of us who are new to garment making. I look forward to hearing from ya’ll.
Debra
I remember reading in the blog that if you can attain either stitch or row gauge to go with the hook that gives you the stitch guage as you can add more (or less) rows as needed. This is my first garment, too. So, not an expert answer.
Mmelvincox
Kendra your ideas of adding the tie and washing the swatch were great. Have completed 1 pullover (lg) and working on another (2x). For the first one I used some cotton yarn that I already had. Got the correct gauge with a J hook. The top looks gorgeous. Plan to post pictures soon. I love this top. Have gotten others to do it. They should join us soon. This is my first garment and CAL. I am looking at my next garment project all ready.
Miranda
m
Once I started I couldn’t stop …I decided not to put the a ribbon/tie at the top…..it still fits nicely with the wide neckline. I also tried it on just before fininshing and decided to add 10 extra rows….just a preference for longer tops. Looks great
Connie Whitesell
I understand that you start the V-stitches in the marked ch space, but I’m having trouble figuring out how to do the V-stitches in Row 1, where there is only the foundation chain. Help anyone?Â
Anonymous
Hi there! You just work the V-stitch in the chain space: in one chain space, you work one dc, ch-1, and another dc in the same chain to establish the corners. Hope this helps!
Connie Whitesell
Thanks, Kendra. That makes sense, except I thought that the pattern said that each V-stitch adds 2 stitches, 8 stitches added each row. Two dc in one stitch only seems to add one extra stitch…..?
CatalpaKay
It works out to be 2 extra stitches at each V-stitch. Because you dc in each dc of the V-stitch of the previous row, plus add the 2 dc to make a v-stitch in your working row. does that make sense? So it’s dc in the 1st dc of the v-stitch, ch, v-stitch (dc, ch, dc), dc in the dc of the other side of the v-stitch. (I figured this out in my second try at the yoke).
Hope that helps.
Patty
Feeling a little imtimidated by the other posts, I began crocheting like a mad women, finishing up the yoke today,THEN, I counted my stitches. I know I should have been counting after every row, even told myself that as I was working, but I was in such a hurry to get this part done. Well I ripped back to row 4 before I found my mistake, so I’m now counting after each row. It seems like a waste of time, until you have to undo hours of work. So for all you newbies, do a gauge and count your stitches. There are reasons why we are told to do these things and for the life of me can’t figure out why we balk at doing them, cause when we follow the advice, the garment/item will look like something you can be proud of. Good luck to you all, I am inspired to keep at it by your pictures!
Sharon Richey
I’m rather new to crochet and I was wondering – if we’re working in the round, why don’t we just keep working around instead of chaining 4 and turning?
Thanks
Zontee
Hi Sharon, some crochet in the round projects are worked around and around without turning, while others are worked by going around, turning, and going back the other way. Since crochet stitches look slightly different on the front and back, the act of turning at the end of each round/row produces a slightly differed texture than going around and around. Many crochet garment patterns are written this way so that if there are sections of the garment that need to be worked flat (say, the section of the bust on a tank-top where the armholes are), they will match the texture of the sections that are worked in the round with the turn (say, the body of that tank top), since both sections would have been worked by getting to the end of your section, turning, and going back the other way (versus going only in one direction if you were working in the round without turning). I hope that helps!
Anonymous
Excellent response, Zontee!
CatalpaKay
Hi Sharon,
I ended up missing the instruction to turn, so worked mine in the round. So far I’m happy with how it is coming out. I’m just on the second row of the body, so don’t know if there is a gotcha coming later on.
Annette
Not quite done with my yoke yet, but it seems to be going well. Hope to be done tomorrow so I can go on with the group. This is also my first real garment (that being something you put your arms through!) and so far I really like the pattern. I’ll post a picture as soon as I get the yoke done. Â
Mesh Raglan Pullover Crochet-Along: Underarm Chains | Lion Brand Notebook
[…] Mesh Raglan Pullover Crochet-Along: Starting Chain and Raglan Increases […]
Anonymous
7/21/2011
Hi Janice,
 Thank you for the excellent and informative post.
Weaving in ends is far from my favorite thing to do whether knitting or crocheting. That being said, whenever possible, I use a Russion join to attach a new skein of yarn. Here’s a how to link:
http://community.knitpicks.com/notes/Joining_Yarn_-_Russian_Join
 With this join there are no ends to weave, simply trim the ends close. I’ve been using it for the project yarn, and it seems to be working out just fine.
 Presently, I am trying to discern what type of tie I want to use on the neck (if I even actually use it – I do like the squared neckline, too). In any case, I’m going between a twisted cord and the pattern chain cord (I-Cord was too thick, and I don’t care for ribbon in this case).
 I’m also not inclined to use a tie bottom design, so I’ve modified my garment to have a crocheted trim on the bottom, an open shell with picot trim (Kate Haxell, 2009, Crochet edgings & trims 150 stitches, p. 26, The Harmony Guides, Interweave). I may use this trim on the arms as well, only time will tell.
I also prefer a longer body length so I added 2†in pattern to the body, and the trim will add about another ¾ of an inch.
Â
When, all is said and done, and it is time to block the garment, I’m thinking that I will gently wash and let it dry on my dressmaker’s form, as I can set it to whatever measurements are desired.
One of my biggest frustrations is that the blog site can be rather glitchy, locking up and losing the comments that one is working on. I guess it’s trying to tell me something!!
Now, I am far from an experienced and/or expert crochet designer – artist, and this is my first adult garment in crochet (I usually knit). However, this crochet along has inspired a bit of a passion in me for crocheting, and I’ve so enjoyed following everyone’s progress….
Â
Attached is my progress to date, the tie comparison, and the beginning of the edge trim.
Â
Happy crocheting!
Tina L Roman
Love the tip on the Russian join, thank you so much!!!
Anonymous
My pleasure!
Bookmarking Social5
Your article is amazing I got an effective knowledge from you article. I want to read more about your other articles on Yarn and Cotton yarn
Mmele059
When it says to turn at the beginning of the 2nd row do you actually turn nag go in the other direction? Do you turn at the beginning of all subsequent rows to 9(10)?
Bethany
Yes, every row you turn, so that it looks like it zig-zags back and forth a little.
Nealandmarileem
I just started this yesterday cause i had something else to finish before last weekend so i hope someone sees this!! 🙂 I have done the chain several times (1x) both ways and i have had extra chains on both ways! with the alt.. to sew together after…i have three extra chains. i have counted and have the right number of dc. in between the v stiches. so what now i dont want a big hole in the back of the pullover.Â
Nealandmarileem
ok so i just took out the two chains and now im almost done with the yoke!! yeah!! but im trying to figure out if anyone else is reducing the rounds of the yoke since we had to change hook size….i may be reworking the yoke  in the smaller size cause mine looks really big!!
Mary
Help! I asked a question yesterday and can’t find it to see if anyone replied. I’m having trouble getting to the current blog site. My question was about the yoke fitting me in hook size H and then the body being extremely large – 9 inches more than the posted size for large of 39 inches. I had asked if switching to size G hook would be enough or if I needed to make some decreases. If anyone replies, please also tell me how to get to the current discussion board. Thank you, Mary
Anonymous
9 inches is a lot. Switching to the G will probably not be enough if you want the fit that the model is displaying. Did you swatch. If not I would do one in F and if necessary in E.
Â
I think if you go up to the calendar in the top right hand corner of the blog and select the 21st, you should be able to go to the current session.
Gul Ahmed Lawn Collection
Your article is amazing I got an effective knowledge from you article. I want to read more about your other articles on Yarn and Cotton yarn