
Hate weaving in ends? The Russian join is an excellent technique for attaching a new skein of yarn or for changing colors. Best of all, it creates a secure join, so you can keep crocheting or knitting without worrying about yarn ends! Here are instructions on how to complete the Russian join in 7 easy steps. I’ve used 2 different colors of yarn, but this is a great technique for attaching a new skein of the same color yarn, too!
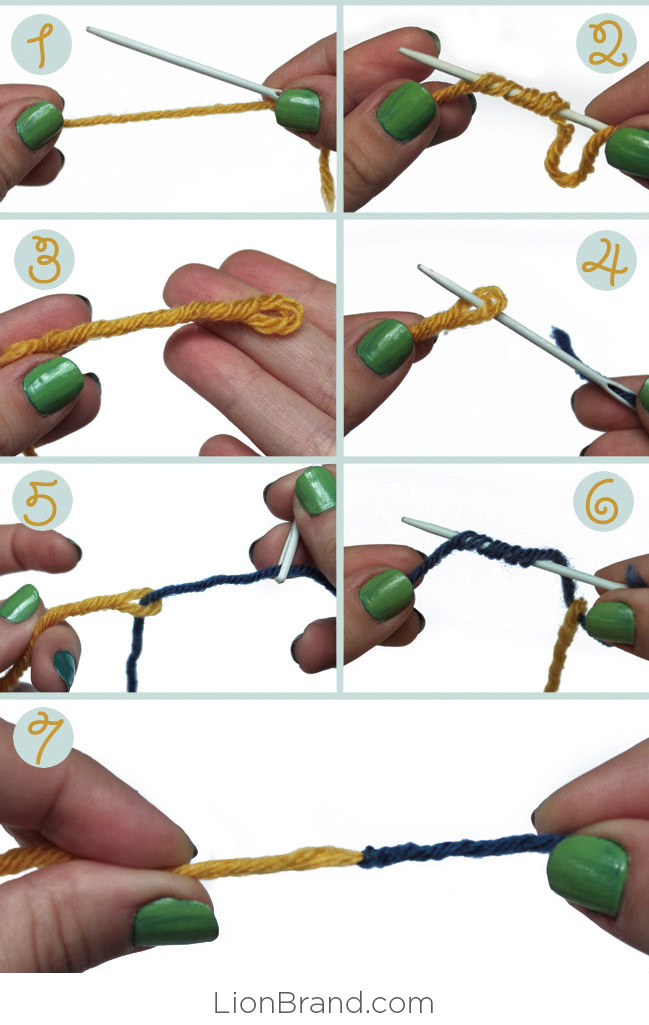
1. Thread a blunt needle with one end of yarn.
2. Work the needle through the plies of your yarn for a few inches. Don’t worry if this looks bunched up now.
3. Pull your working yarn through, leaving a small loop at the end. This is where the second piece of yarn will be attached.
4. Thread your needle with the second piece of yarn, then insert the needle into the small loop you created before.
5. Pull a few inches of yarn through the small loop.
6. Like you did before, work the needle through the plies of your second piece of yarn.
7. Give each strand a little tug to smooth out the bunching. You now have a secure join! Trim off any excess ends.
That’s all there is to it! Depending on your yarn, you may notice that this joined area is slightly thicker than the rest of your yarn. I find this isn’t very noticeable when I’ve worked my projects, but it’s something to keep an eye on.
Related links:
You must be <a href="https://blog.lionbrand.com/wp-login.php?redirect_to=https%3A%2F%2Fblog.lionbrand.com%2Fhow-to-russian-join-yarn-in-7-easy-steps%2F">logged in</a> to post a comment.
Chellis
This is a brilliant trick! Thank you!
Barbarastewart4396
wow! Great idea! Can’t wait to try this…. thanks!
annie_galle
I learned to do this as a child in Copenhagen Denmark.It works well.Thank you for reminding knitters to do this ,works for any hand project.
Lisa Tarpley2087
Thank you so much!!
Grannynickel
I cannot believe this is so easy! No more knots!!!
Jen
I have heard of this before, and seen pictures of the end result, but you explained very well how to do it, and do it easily. Â Thank you so much!
Cristylynne
Wish I’d known about this years ago! Now, when you’re done, you’re really done!
Alicia
Awesome! Thanks for sharing.
Wenkip
Love it. Will save me alot of time and effort when I’m using up ends of the balls. Thanks for sharing it with us.
rita castillo
Fantastic, thank you so so much
Megatia
wow… could’ve used this info a while back in current project!! not quite ‘getting’ ending a color @ the end of a row & starting a new color when striping, tho… maybe it will come when I try this.
Jess Hicks
Hi, Megatia. If you’re switching colors at the end of the row, keep knitting/crocheting until you reach the end of the row, then cut your yarn, leaving a tail that’s a few inches long. Rip back 4 or 5 stitches and work your Russian join, then reknit or crochet the stitches that you ripped out. Now you should have a secure join, so you can just keep on working your project. Hope that helps!
Mzurick7
Great technique but I’m not quite getting this. How do you get the yarn off of the needle? Does your blunt needle have a slit in the eye?Â
Mzurick7
 Oh, I just figured it out 🙂
smileyshraddha
I haven’t, how do you do it? I’m so confused..
smileyshraddha
Nevermind.. YouTube is great for learning too.. If anyone is still confused, this video really helped me understand step 3 better http://www.youtube.com/watch?v=01O3qC6GH8I
Dc2610
Thanks for the link.
Grr114
has anybody tried this with lace weight?
Jess Hicks
I haven’t done it with lace weight, but I have used this technique with fingering weight yarn on a size 4 needle. The result was slightly thicker, but it wasn’t noticeable in the finished sweater.Â
Angela Moore
Wow, how clever, I’m going to have to tell my friends in my local Project Linus group.
Poagep
awesome no more weaving in or knots woohoo
Voonsuanngo
very clever. will use this method from now on!!!!
Â
Julesbois
Oh my this looks great! Yes I hate weaving ends!!! I just tried it and I will do this all the time from now on…
deb
i’m knitting with some very thin yarn that does not look right with woven in ends; this should be great!
mn_me
this will come in very handy on an afghan i have in the works… thanks for the tip.
Jhurst904
so easy to understand and a much better way to join new yarn to the old. Thank you
Â
Barbara
I love this idea. Â Wish I knew this along time ago.
Rose_tong2000
Wow, I love this!!!!!
Bartha
This is amazing:-))) Thanks!!
Alia
many thanks for posting this. i thought i was doomed to a long life of weaving in ends and trying to tuck in knots.
and Spasibo (sp?)Â to the Russian who developed this wonderful technique!
roxulikeababy
Can’t wait to try it! This may be the most helpful tip I’ve gotten since I started knitting!
Kirsty
Ditto to everyone! This is great! I have to go start a new project now so I can try it…
Kathy
How do you make the color change occur at the right place?
Zontee
Hi Kathy, for color changes, a tip I got from Patty–director of the Lion Brand Yarn Studio retail store and education center in NYC–is: work with the first color all the way up to where you want to change the colors and cut the yarn (leaving a short tail) then undo the last 4 or 5 stitches (so you have enough space to do your Russian join; join the two yarns; re-knit or crochet those stitches and keep going–it should allow you to transition the colors right at the point where you wanted them to change. Hope that helps!
Jess Hicks
Hi, Kathy. A swatch comes in handy for this. Try knitting or crocheting a set number of stitches, mark where you ended, then rip out the stitches. Measure the distance from where your stitches started to where they ended, then divide by the number of stitches you worked. That should give you a rough idea of where to place the color change. For example, let’s say that you crocheted 10 stitches and found that each stitch took an inch of yarn. You could then stop 10 stitches before the color change should occur, measure out about 10 inches of yarn, and place your join at the end of those 10 inches. I hope that helps!
Mkallsnick
This sounds like a must try idea but can you better explain step 3? How and where do you pull the working yarn through in order to create that loop?
Thanks 🙂
Jess Hicks
Sure thing! After working the needle through your yarn for a few inches, you’ll see that it’s kind of bunched up. You just need to pull on both ends of your yarn a little bit to flatten out the yarn. You’ll notice that where you began weaving in the needle, there will be a small gap. Pulling really hard will close the gap, so just make sure that you don’t tug on the yarn too tightly. It sounds a little awkward to explain, but give it a try and see how it works out for you. 🙂
Nina
What a great way to join – Thanks for sharing!
Joining Yarns « wool gatherings
[…] yarns properly is one of the many challenges for me, found this on Lion Brand’s and it seems easy […]
Rose
I found this technique a few years ago and absolutely love it. If there’s one thing I hate about knitting and crocheting, it’s having to weave in ends and this pretty much eliminates that. Try it; you will definitely like it.
karen
I have been trying to do this for 30 minutes and all my yarn got was tangled, I don’t get it.
Jess Hicks
Hi, Karen. Did you remember to smooth out your yarn? You’ll need to pull a little bit on both sides of the yarn to get everything nice and even.
MycoCreations OrganicCreations
FanTabUlous!!! Thanks for sharing 🙂
Susan Pauley
Slick. This works great.
thewellhunt
I only do step 1 & 2. In step 2 I am weaving in the new colour. I have being joining this way for many years and have never had any trouble with the yarns separating.
Happy Sticks
I’m going to try this one today with the project I’m doing. Â Can’t wait to get to the end now! Â I’ve only been knitting for 10 years…but OMGoodness this is great.
Airbrusher
does this also work with cotton yarn?
thewellhunt
 Yes, this method works well with cotton.
Susan
I’ve been knitting for nearly 60 yrs. Years ago, people didn’t bother “naming” the techniques…so when I let you know that my Russian neighbor taught me to join yarn in a similar fashion, I thought that would be “Russian join”….anyway, it’s a little simple, in 2 ply or a loose single ply, you just thread the new yarn into the ply of the old yarn, and subsequently the old yarn end into the new yarn. No twisting. No thick spots. Easy peasy. Must be a very old technique since 60 years ago the neighbor was 70 . Try it.
Joyce
It’s been 65 years for me and I figured out on my own how to do it “your way”. Will try this new way on some finer yarns but am satisfied with the way we both do it. Wishing you many more years of knitting!
onceuponatime
Oh – that’s fabulous. I will definitely use that one!
queenmom
I love this. I wish I had known about it soon. Thanks for the tip.
rosiewho
I found this (Russian Join) on Youtube a couple of years ago. Â Lots of info there on all kinds of knitting/crocheting. And the visuals make it easy to understand.
Christina
I seriously wish that I’d have learned this method so many years, so VERY many skeins of yarn! ago. Thank you for “teaching” us! I’ll def have to teach it to all my friends!
Karen
Before my friends 92 year old mother died she taught me how to weave the yarn ends together like this…I’ve been doing it that way ever since…may she rest in peace with her needles in her hands!!!
Virginia
I can’t wait to try this soon, especially with dishcloths. Â One suggestion would be to put the instructions right underneath each picture instead of all of them being way down at the bottom where one has to keep scrolling up and down to read each instruction for each picture. But thank you for posting this. Â It was extremely helpful.
Ambee1156
I just learned this technique last month and loved it immediately. I’ve already used it in many projects with no noticeable yarns sticking out. Old or new technique – I’m glad that I know how to use it now.
Tinavh_1436
My problem was that my ends came out of where I pulled them thru when I tried to work it. Anyone have that problem?
Erby404
this is so welcome. what an exceptional idea. thank you
Jlujan
I do it a slightly different way. I take the new thread on a tapestry needle and go back about three to four inches. I then weave the new color through the old backward about an inch and a half. I then take that color off and put the old color on the needle and go forward through the new yarn about an inch and a half. I take that off the needle and pull from oth ends to see if there is enough tension to hold them. THen I snip off any remaining ends.
Dinerwillyb
i’ve used this technique for several years. i hated working a blunt needle thru the yarns, so i took a large eyed steel needle to a saw/grinding shop and had them grind me a sharp tip on my needle.
Jefferswendy
I must be dumb because I can not figure out how to do this…. I thread the needle with my yarn that I have been crocheting with then I wrap the thread around the needle, then what? One end is attached to my project and the other is just the end threaded through the needle
Geraldine
hi jeffers, I dont think you wrap the thread around your needle, rather i think it should be shove your needle  through the plies of your yarn, hope that helps?
Baskar
Hi Jeffers, hopefully you have figured it out by now. If not, here is how I did it. You thread the working yarn thru the needle. Then you pick up part of the fibres with this needle about 7-8 times at 1/4″ intervals towards your project. Now pull the end thru being careful to have a small loop.
Now thread the joining color yarn thru this loop and here is the part you need to pay attention. You will be doing the same thing as you did with the working yarn EXCEPT make sure your working yarn is now inbetween the needle and the fibers you have picked up 7-8 times. Now tug on both the yarns and voils! You did it.
Good Luck!
Julesbois
I just love this! I used it again this time with a chunky yarn and worked beautifully. I wish I learned this before all the afghans I made and was left with so many ends to weave in…
Megan Elberty
I love this technique! It is similar to tying a quick knot after threading a needle. As one who loves working with multiple colors but hates working in those ends, I am so excited to try this out. Thanks.
Geraldine
love it, thank you so much, will bookmark this page.
Mizufusion
This is brilliant! Now I have motivation to work on my nalbinding project again. That thin is nothing but loose ends!
Baskar
Love the technique! First the instructions looked hard but as i followed step by step, it dawned on me… Sad that I didn’t know this when i was doing granny squares but Glad that i know it now. Thanks lion brand. A simple suggestion… To go thru part of the fibres of the yarn atleast 7-8 times so the end is completely hidden.
Dané Samuel
thank GOD! i’m reaching the end of my skein for an spiral afgahn. didnt know how to join the next skein on. between the pictures and the step by step instructions i wont mess up!
Celia
Help – no matter what I do, the ends keep poking back out of the fabric once I’ve worked over the joined areas. I trim the ends sticking out, and then the new ends start poking out almost instantly. Cannot figure out how to keep them in the join. 🙁
Patricia_forster
This is amazing. I have been knitting and crocheting for 40 years and have never seen this. THANK YOU.
Sarah Curtis
Cant wait to try this … I have also been knitting for about 60 years and it is new to me. …as my Mother used to say .. “You learn something new every day”  ;-)  Love the nail colour but thats probibly because I am IRISH  😉
Kroman
Awesome! I am defiantly trying this on my next project!
Suanna
FANTASTIC!!!! I will be using this from now on!!! I knit and crochet los, since I have 9 grands and 1 great grandchild! LOVE it. Thanks
Nosnah
Been doing this for years thinking I made this up. Now I find out the Russians beat me to it. Oh well, it’s still a clever way to join yarns. When I’m concerned that the join thickness will show I cut each ply of the yarn just a little shorter so it becomes more gradual. (Make sure that you cut too close to the join.)
Wenchnhalflock
I love this! I just tried it with kitchen cotton today and it worked perfectly. Thank you so much!
Grand30
Can’t wait to try it out. Hope I’m not too silly to follow your instructions. Can’t wait to show the other crafters in my group as all of us hate joining and find it really tiresome when most wool we buy already have a huge knot in it (even the best yarn you can buy have knots instead of being free of them). All these ideas help to make our work look more professional even if we are intermediate. I’m a beginner in knitting so this will be a real help there.
Siouxsiesue
Fantastic! I’ve just tried out this out and it’s so easy, I can think of so many projects where I could have used this in the past. Thank you!
Ximena Porras
Great, it´s the solution to alpaca wool, cause it´s very slide
Unión rusa! | Pupol
[…] Les dejo acá algo muy útil para cambiar de color en el tejido o cuando se te acaba el ovillo . Lo encontré en este blog. […]
Charlene Varry
fantastic.
Mona Lisa
I love this! No more ends and no more knots. Very easy to understand.
Tatted Necklace Re-creation » My Hands-on Life
[…] I had to do a couple joins of new thread, I decided to try out the Russian join that I saw on Pinterest. It was tough since my thread was only like 3-4 ply, but I am super happy […]
pepi
never thought this would work!!!!! but it did, superrrr
Guest
I love this way of joining yarn will be using it on all my projects!
Mariasha
Thanks for the incredibly easy-to-follow directions! This is my new favourite way to join yarn ends!
Grammielocw
Oh, thank you so much for this share. No more knots or hanging ends.
Tamra Robertson
Thank you for such a clever way to join now yarn; can’t wait to try it.
Pat
Wonderful… can’t wait to try this.
calluntome
I have a question ……………… If I’m going to change colors, I want it to change at a certain point, not randomly. With this method, how do you guarantee the point at which to do this in order for the color change to fall right where you want it?
Zontee
Hi calluntome, Patty Lyons here at the Lion Brand Yarn Studio once showed me just this. Her trick was to knit the section in the first color and then clip it, leaving a 2-3 inch tail. Then she unraveled 4 stitches (to leave a little more room for the join), did the Russian join to the second color only weaving in that tail section for the join, and then reknit the 4 stitches and continued knitting, making the change to the second color automatic! Hope that helps!
calluntome
Thank you so much. I’ll have to try this. I make many projects and don’t like the tucking and weaving of the yarn. Also, then my customers don’t have to worry over strings coming out afterwards. God Bless!
TAMom
my gosh .. genius idea, love it!
Chris
Thank you very much I will surely use this.
Meg
Great idea thanks
rin
I don’t get ( :
Zontee
Hi Rin, try checking out some of the great videos available online from other knitters: http://www.youtube.com/results?search_query=russian join
andvand
I wish I knew this 50 years ago! Oh well, from here on in my knitting will look much more professional! Thank you!
Rae
this is really easy once you do it a few times and also makes quite a difference in your finished project.
Monique E.
So cool…Tks for this post!
Katieann179
What a great way to ‘tie on’ new skeins! I’ll certainly be using it from now on. Thanks for the info.
Wendy L. Oldham
Thank you for this tip. I just finished two baby afghans with yarn I don’t think this would work with as they didn’t have a ply. But, I’m going to use this with all future projects I use ply yarn.
Debra Peters
I did it with “speed cro-sheen” ! very cool – no more knots in my work– thank you, thank you!!
Heather McLeland-Wieser
Looks very cool. Can’t wait to try it. I’ve got 3 project all nearly ready for a new yarn.
Sara
I love this little trick! It’s so much better than knotting them together.
Save Time by Doing Finishing Work as You Knit or Crochet! {diy} | Desperate Houselife
[…] The Russian Join: This is a fantastic way to add a new skein of yarn to your work without weaving in any ends. It creates a steady, secure join, so it’s great for most yarns. […]
How to Russian Join Yarn in 7 Easy Steps | Desperate Houselife
[…] weaving in ends? I know I do. Lion Brand has this awesome tutorial on How to Russian Join Yarn in 7 Easy Steps. Check them out for more specifics. I love […]
The Magic Knot - The New Way to Join Yarn - Sakeenah
[…] video explaining the “magic knot”, which is a double knot used to join yarn. Till now, the Russian join has been my go-to technique, but I don’t like the added bulk. With the magic knot technique […]
Knitting - A Lost Art | Betsy's Photography
[…] How to Russian Join (my favorite way to start a new skein) […]
JeanG
This is very cool. Can’t wait to try it!
Evelyn Mayfield
This is timeless…at 75, I have been crocheting for what seems like centuries and I cannot believe I never learned to do this. Forgot knots; forget crocheting over loose ends; forget weaving zillions of ends at the end of a project. Hands down, best tip ever. I just blogged about this tonight, and pinned it, also…thank you! Here’s the link…
http://prayersncrafts.blogspot.com/2014/09/love-russian-join-for-invisibly-joining.html
MizDoreen
I have been using this technique for years, it is so simple. You can even use it when changing colors in stead of crocheting over your ends. It keeps them from popping out later.
Yvette Marie Arauz Thomas
Thank you for sharing this! I will have to give this a try.
Dixie's Hat Rack
OH My Goodness….These tips are awesome…Thank you so very much……Many kudos to you!! 🙂
Linnea McCormack
This is a great photo/written tutorial. Thanks so much!
Tracy
How does this hold up on an item that gets machine washed?
Zoë Williams
Hi Tracy. I have personally used this join on some cotton dish towels that are regularly machine washed and it seems to be holding up fine. If you are worried, you can always try including a join in your gauge swatch and washing that a few times before you commit to using this join throughout your project!
rhonda
just lovely . Thank you.
Atiqur Sumon
Great tips.
lifesaver1
When we were living in Germany a German neighbor taught me a similar technique – which BTW works best when attaching similar or the same colors as far as how the finished item looks.
Goddessence
I am not getting Step 2. Its not clear. Do I pierce the plies? Or just wind the yarn round the needle?
Im sure its a great method, I just do not get it from the instruction
Lion Brand Yarn
Hi there! Yes, you’ll want to loosen up the ply of the yarn you’re joining. Separate the plies by inserting the needle through the strand. Hope this helps!
Pam
You have just rocked my crocheting world!! Thank you!!
R
Beware this does com apart! I have tired it several times and when I pull the two yarns come apart. Me I will be knotting so I KNOW they wont come apart
Lise J Lacombe Gaudet
I love this idea, will share with a few of my knitting friends thank you so much for this extra brilliant idea.
Texas Star
Yes, this CAN come apart on you, especially if you use a looser yarn. I had it come apart on me with some Aran yarn… the real Irish deal. So yeah, I’ll keep my knots and stitch-in method of dealing with the ends. I don’t feel that I can trust this on every project or with every yarn. Maybe if I make the “splice” longer… or don’t snip the excess away so close to the splices in an effort to be neat and tidy… it might work better, but this is a rather niggly technique for something that doesn’t seem all that secure to me.