A Happy New Year to all of you! I’m sure many of you have been very busy these last few weeks with all sorts of holiday projects. My Cable Luxe Tunic has been sticking up out of my knitting bag trying to get my attention – and now it finally has it again! Quite of few of you have felt you’ve gotten behind on this KAL, but now that the calm of January is here, you can continue (or start!) this project and actually learn from all the hints that other knitters of the tunic have posted so far.
So, where am I on the tunic? I had thought that by now I’d have both the front, back, and both sleeves done — and would be working away on the yoke — the reality is that I have the back finished, and a sleeve done. When I finished the first sleeve, I realized that maybe I would have to adjust the length for my daughter, since she likes to wear her sleeves longer. I decided to put the sleeve stitches on a holder, and get going on the yoke, so that she can try it on before I finish the sleeves.

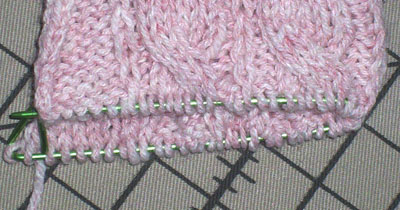
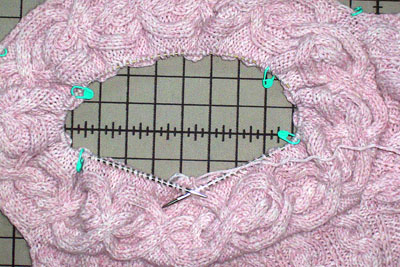
When I started the yoke, I caught myself ready to make another mistake! Luckily, I reread the instructions and saw that the circular needle I need for the yoke has to be a size smaller than the needle used for the body of the sweater. I needed a US 9 needle for the tunic, so I used a size 8 24″ circular needle for the yoke. The instructions told me to start at that back center seam of the cable strip and pick up all the way around back to the seam. I placed 4 markers on the top edge of the strip right above marking the spots where the back, left sleeve, front, and right sleeve start.

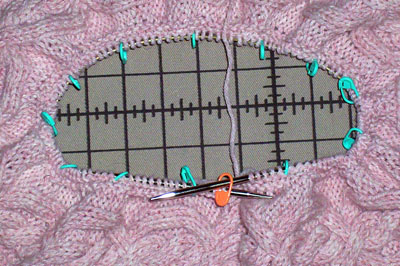
With the right side facing, I picked up the stitches just like I did when I picked up for the back, front and sleeves. I really love to use markers that attached to my knitting and this isn’t the only time I will use them for my yoke. I picked up the 130 stitches for the yoke, which is what the small size total stitch count. To make sure the stitches didn’t fall off the end of my needle, I put a point protector on the other end of the needle.
Although the pattern asks for a circular needle, the yoke itself is knit back and forth, so I placed a marker at the end of the row to remind me to turn my work and knit back. Could you knit this yoke in the round? Sure you can — all you need to do is remember to work the garter stitch in the round which is knit 1 round, then purl one round. And also remember that if your stitches get too tight around your needle after your decreases, you may have to switch to a 16″ circular or double-pointed needles to get to the top. I’m doing the yoke as it is written in the pattern, and I don’t mind the seam in the back which will continue from the seam in the cable strip. By knitting it in rows, I knit every row to get garter stitch this way.
For all the sizes, the yoke decreases every 6th row and for the small size I have to decrease 13 stitches evenly across each decrease row. To make this easier, I am using my markers again to mark 13 places in my knitting. Since there are 130 stitches, I will place a marker every 10 stitches (I decided to go in 5 sts on each end of the row — this still makes 10 sts between each marker, and I won’t have to decrease right at the edge of my row.)

Now I will knit the 2 stitches before each marker together on every decrease row. After all my decrease rows, I can remove the markers and just knit up until the garter stitch yoke measures 3″ from where I picked up the stitches. So that’s my plan and if all goes well, I should have this tunic ready to sew up next week. Here’s wishing you all a year filled with happiness, health, and as much knitting as you can fit in a year!
Related links:
You must be <a href="https://blog.lionbrand.com/wp-login.php?redirect_to=https%3A%2F%2Fblog.lionbrand.com%2Fcable-luxe-tunic-knit-along-moving-forward-in-the-new-year%2F">logged in</a> to post a comment.
Ann B
Thanks so much for sharing your experience! I like the idea of spacing markers to make the decreases easier. I just started my project on New Year’s Eve, so the yoke is my focus at the moment. Hopefully I can finish that up this weekend!
Becky
I have just realized that my increases in the purl sections for the “waist shaping” are leaving small holes in my work. I did the M1 type of increase and I’m wondering if I should just purl into a stitch twice to avoid that hole? Or did I make the increase wrong? I picked up the “ladder rung” and purled it for my increase. Has anyone else had this problem? I am doing the body on circular needles to avoid those nasty seams. Thanks.
Michèle Girard
In reply to Becky:
There are two types of increases that are not too noticeable in purl or ribbing.
1. The raised increase: where you pick up the purl bump from the stitch below the next stitch and then put this bump on your needles and purl it. Or if you want to make an increase after a stitch, then you have to pick up the bump 2 rows down and lift it on your needle and purl it. Make a search for “raised increases” online, you should find pictures or diagrams to help you out.
2. The kfb, or bar increase where you knit in front and back on a stitch, this one is better done on a knit stitch at the edge of the purl section, because it will make a little bar that will easily hide in the purl section.
The M1 is probably the one that will show the most, especially if you didn’t twist your stitch when you purled it.
Personally, I did a raised increase in this project.
This was my 2 cents, now Heather may have another take on this 🙂
Christine W
I did my increases on a purl stitch by purling into the front and the back of the same stitch next to the cables. There is a very small bump that is hidden in the purl but other than that it isn’t really noticable.
Becky
I did the next row of increases using purl into the front and back, and I think it looks better for me. I can’t wait to get this done and to wear it to the office!
Christine W
I’m glad you like your increases better this time!
Ann B
Yeah! I finally finished my yoke. I’ll post pictures to Flikr when I have a chance to shoot some. I’ve been printing off everyone’s comments to make sure I review issues others have encountered, now that I’m ready to start on the back! 😀
Nicole
Hi Heather,
I’ve completed my garter stitch yoke, I only did 12 rows, ending with 104 sts. after decreases and then ended it. I did this because I don’t like my necklines coming up too high, and this seemed to work really nice when I tried it on. I’ve also completed 1 sleeve and have started the second, I did like you and made the sleeve a bit longer, about 18 1/2″ long. I was wondering on your next post if you’d give some tips on sewing the sweater together as this is my biggest challenge in knitting. So far the sweater looks beautiful, and I want to be sure to finish it properly. Thanks for all your help and tips.
Joann
I think I should label my endeavor the “Knit Behind” instead of the “Knit Along” since I’m going so slowly. Perhaps there are others who can relate! Many blessing too all of you who have got me so far. I’ve finished and seamed the yoke (after 3 tries), have finally picked up stitches properly (that only took me a week and a half)and am now merrily working on the body by stitching in the round, which I have never done before. For the first time, I finally have a rhythm to my knitting. I stumbled a bit on that line of single knitts until I figured out that you knit on the even rows and slip on the odd ones. I am knitting the 1X and was a little concerned about what people said about the armholes being a little tight, so I added some stitches under the arm. I’ll see how successful that is as I go along.
Ann B
Joann, I’m there with you. I just finished the yoke on Monday night, so I’m working on the back. I’m knitting up the Large. Good for you, figuring out the slipped stitches! It gives a neat appearance with the knit stitch being two rows high. Keep on knitting! 😉
Connie
For all you people worried about too small armholes-My sweater is done and my armholes are perfect. Heather suggested that the people who have too small armholes have perhaps not sewn the sleeves properly at the top; instead of sewing it to the front of the sweater (to the underarm cast on stitches) they have instead mistakenly sewn it together as the top of the sleeve.
Karen
Joann and Ann B, I’m right there with you as well! I didn’t even get my yarn until Jan 2 and I’m glad I did as the yarn was on sale for $1.99 per skein. I’ve finished the yoke band and back. My hands are arthritic, so they are cramping up. Thought if I did the right sleeve next (started last night), it might give the hands a bit of a break. I only have the shorter needles, so cramming all the stitches for the back makes knitting a little more difficult. Luckily, I’m making the small. I, too, noticed the anticipated narrowness of the armhole, but I am a large size (2X) and am hoping it is just the size difference! I haven’t knit in quite a while and love getting back to it. Perhaps I will start at the beginning of the next knit along so I won’t have to be playing catch up. Hope all is going well.
Parma
I am very excited about the look of my sweater. I am still working on the back. I completed 50 rows over the Christmas holdiay and then saw the posts about the pattern corrections. I also had several error as I tried to understand the pattern instructions so I ended up frogging the 50 rows and starting the back over. I am now working on knitting to the 18 inches for the back.
Like others, I have done the make 1 by picking up the horizontal yarn on the previous row. I now have these lovely little holes. On the front, I’m going to try some of these other suggestions for increasing stitches. This is still a difficult part for me. I have only been knitting since Aug 08 but I have learned so much already. My 14 year old daughter taught me to knit and now she thinks I am completely crazy—she’s right though.
Thanks for all of the posts. This is the best knitting club I have ever been in. 🙂
Christine W
I’m at a stand still for the moment. I’ve redone the last 5 inches of the back at least 3 times. If I can figure out exactly where I am I only have 5 more inches to go on the back.
I’m thinking I will do the garter stitch yoke next, just to give myself a break from the frustrations I have been having since I got off pattern for the cables.
I started Dec. 6 and this is all the farther I have gotten. And I spend almost all of my free time working on it (between 1 and 3 hours a day).
Oh well, I consider do-overs cheap knitting (more kniting per skein.)
Joann
I’m coming up to the part where I shape the waist.
I am busty and long-waisted. When I sew, I always have to add 1 1/2″ inches to the length of the bodice. The pattern calls for beginning the shaping after the second repeat of the center cable. I am thinking of not doing this until after the third repeat where the flair will start just below the bust line. I know I have enough yarn over the bust to cover the bust. What do others think?
Emily
Hi all,
Regarding the small holes under the M1 increases, I had this same problem on my first row of increases, even though I purled into the back loop after lifting the new stitch on my needle(you apparently get a bigger hole if you don’t). I followed the pattern (I’m making the small) which led me to make my increases in the middle of the purl section, rather than right next to the slipped stitch or cable.
On my second row of increases, I followed Heather’s suggestion of making the increases right next to the cables, and I found this worked much better and there were no small holes! I’m not sure exactly why this made a difference, but it did.
Hope this helps!
Christine W
I was just looking through the notes for the previous 4 or 5 sections and noticed people are still adding lots of good comments-and some questions.
Is anyone monitoring the previous sections or is it just figured that anyone looking around back there will help out?
Connie
Hi Christine, I have loved this Knitalong, loved everything about it other than what you just mentioned- that new posts dont automatically default to the same spot, so comments, questions and new posts are disjointed, and perhaps some group members are wondering why no one is answering their questions. By the way, there is another new post by Heather I found by accident.
Deborah
I don’t knit on circular needles. What do you think about finishing the cable yoke without connecting the ends. Doing the garter yoke next and then connecting the seam in the back. Finally doing the body (front, back and sleeves) last? Also, how can I make the garter yoke higher, but not too high that the opening is too small to get over my head? Finally, is there a way to download a corrected pattern if we downloaded the free version originally? I found the corrections, but it would be nice to have a corrected pattern on something this detailed.
Betsy
Anyone still Knitting along?